2536. Data Persistence with JPA & EclipselinkJPA, Eclipse, Eclipselink, and ORM
Use JPA and Eclipselink to persist data into database.
1. JPA, JPA Provider, Eclipselink, Hibernate
1.1 JPA
JPA stands for JAVA Persistence API. JPA is a collection of classes and methods to persistently store the vast amounts of data into a database.
1.2 JPA Providers
JPA is an open source API, therefore various enterprise vendors such as Oracle, Redhat, Eclipse, etc. provide new products by adding the JPA persistence flavor in them. Some of these products include: Hibernate, Eclipselink, Toplink, Spring Data JPA, etc.
1.3 EclipseLink
EclipseLink is the open source Eclipse Persistence Services Project from the Eclipse Foundation. EclipseLink is the default JPA provider implemented by oracle.
1.4 Hibernate
Hibernate is a high-performance Object/Relational persistence and query service. Hibernate not only takes care of the mapping from Java classes to database tables (and from Java data types to SQL data types), but also provides data query and retrieval facilities.
1.5 Difference Between JPA and Hibernate
JPA define guidelines to implement the Object Relational Mapping (ORM) and there is no underlying code for the implementation. Where as, Hibernate is the actual implementation of JPA guidelines.
2. Installing Eclipselink in Eclipse
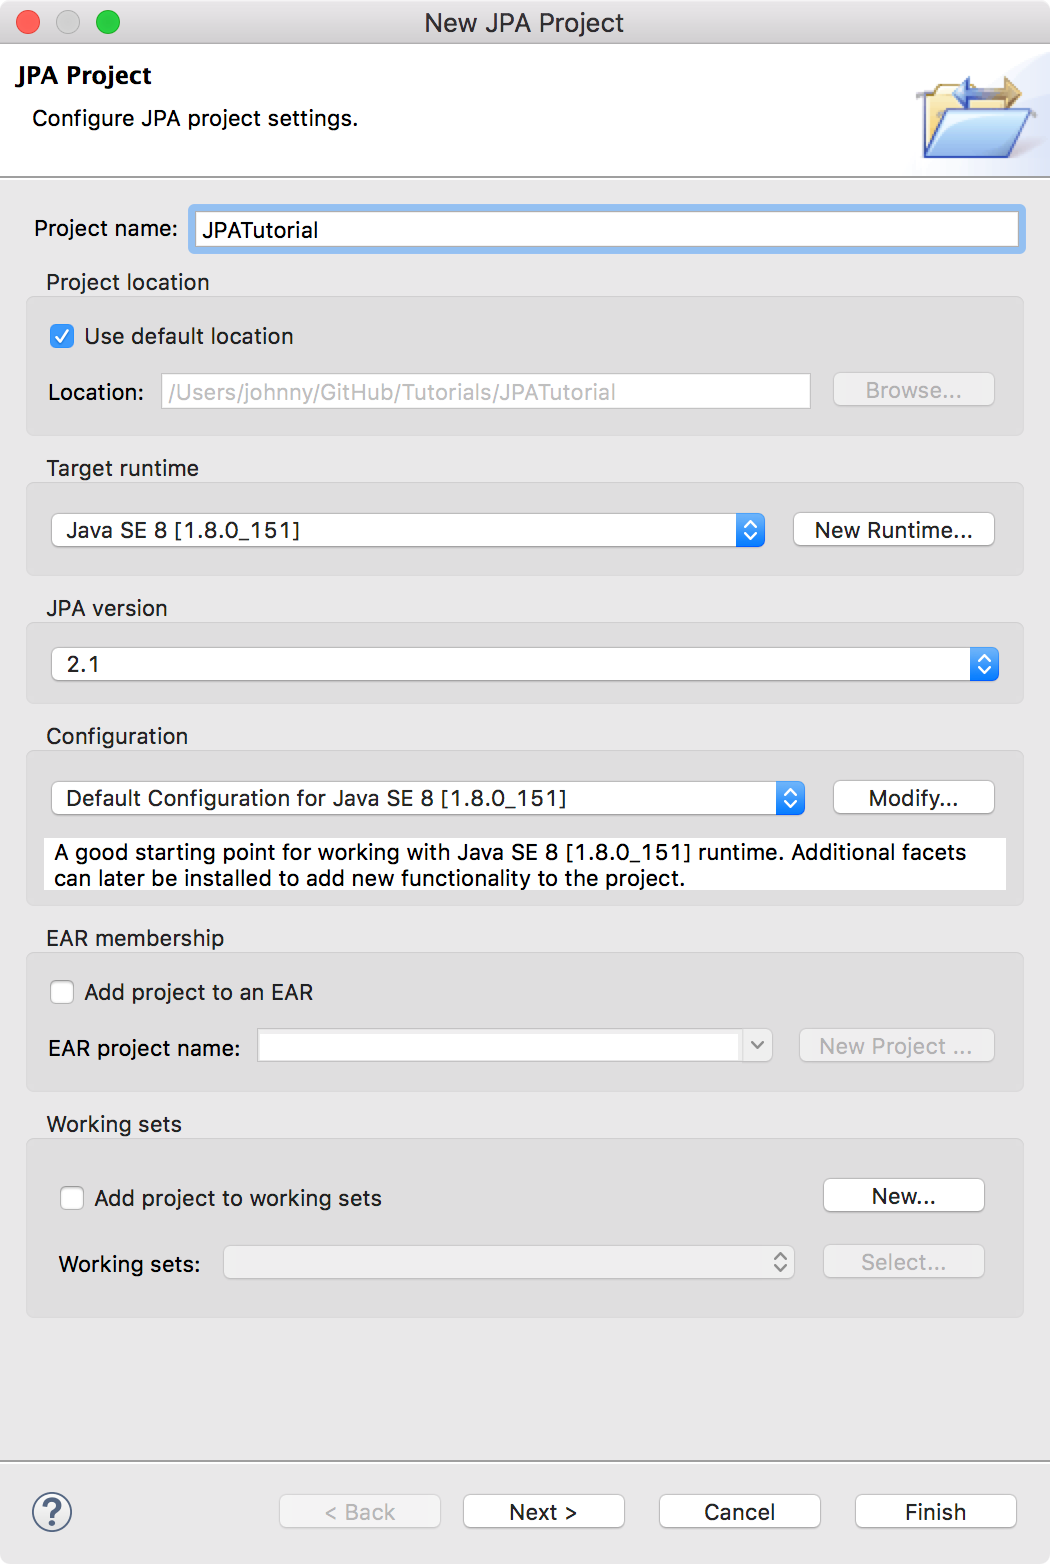
In Eclipse, File -> New -> ‘JPA Project’, Name: JPATutorial, and select ‘Java SE 8’ for target runtime, click Next.
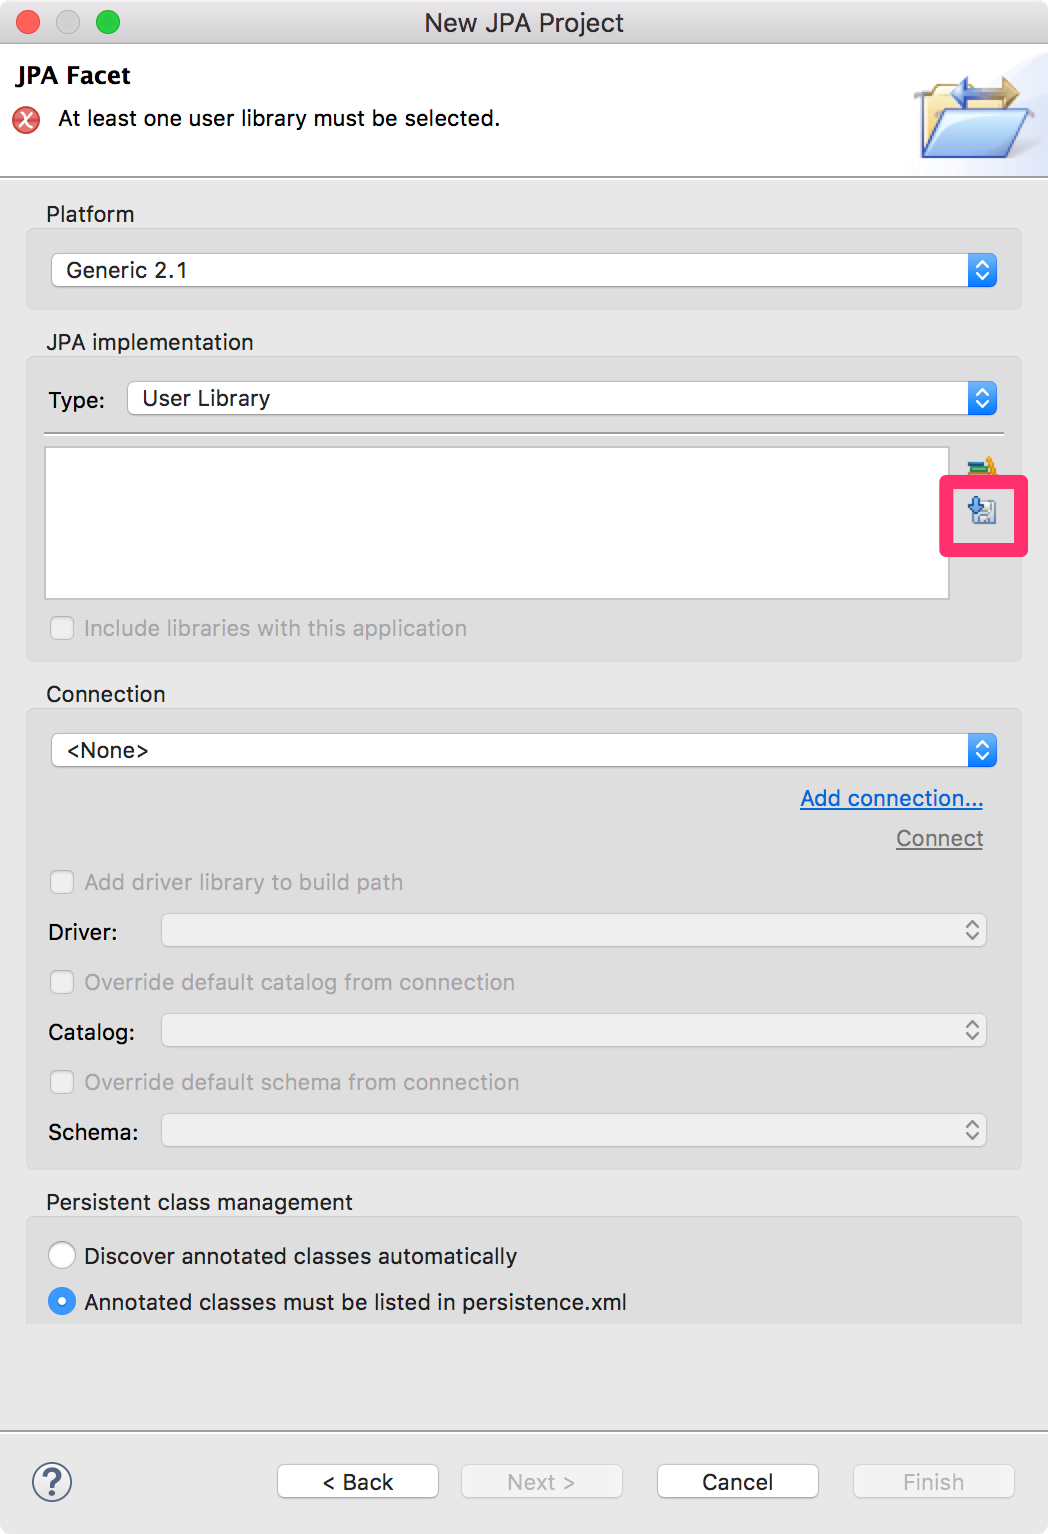
In JPA Facet, click on download library (if you do not have the library) in the user library section:
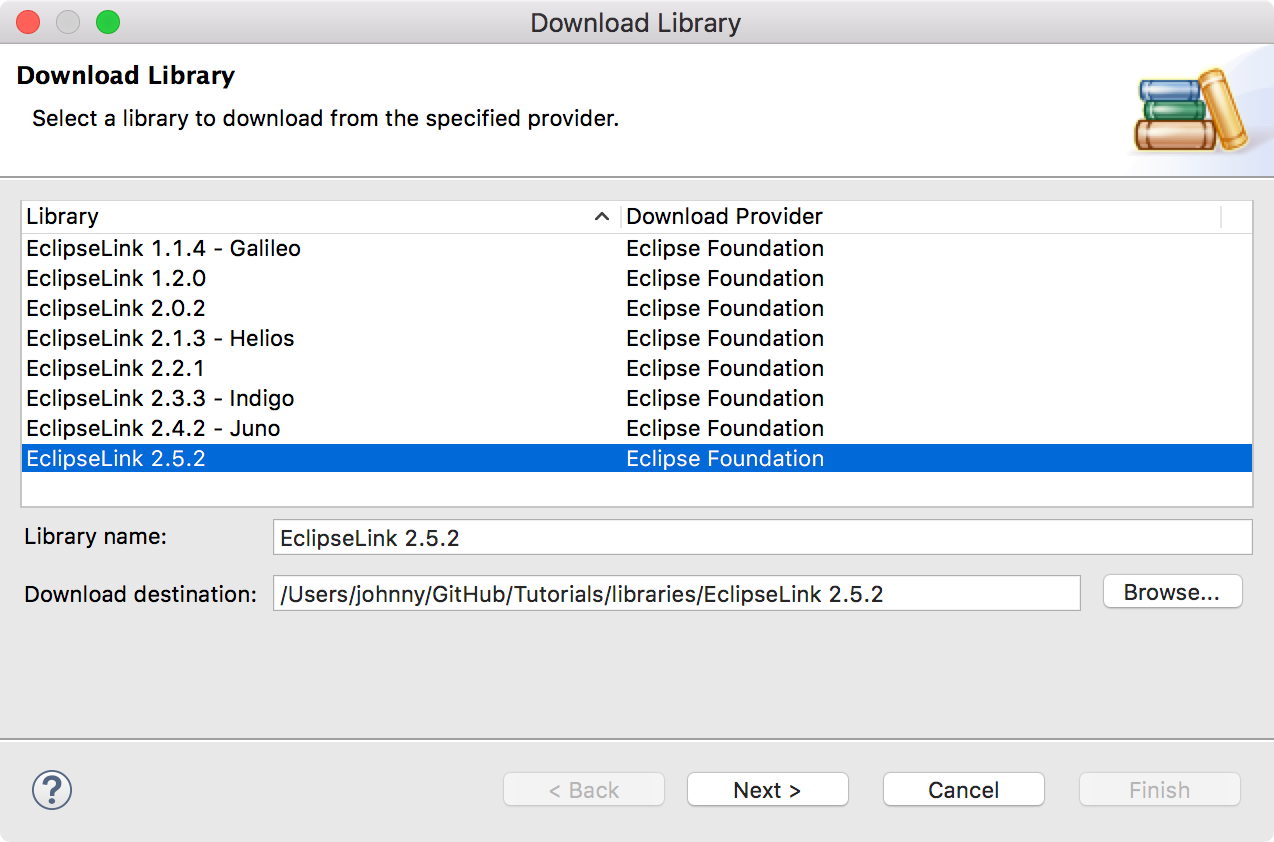
Select the latest version of Eclipselink library and click Next.
Accept the terms of license and click Finish to start downloading.

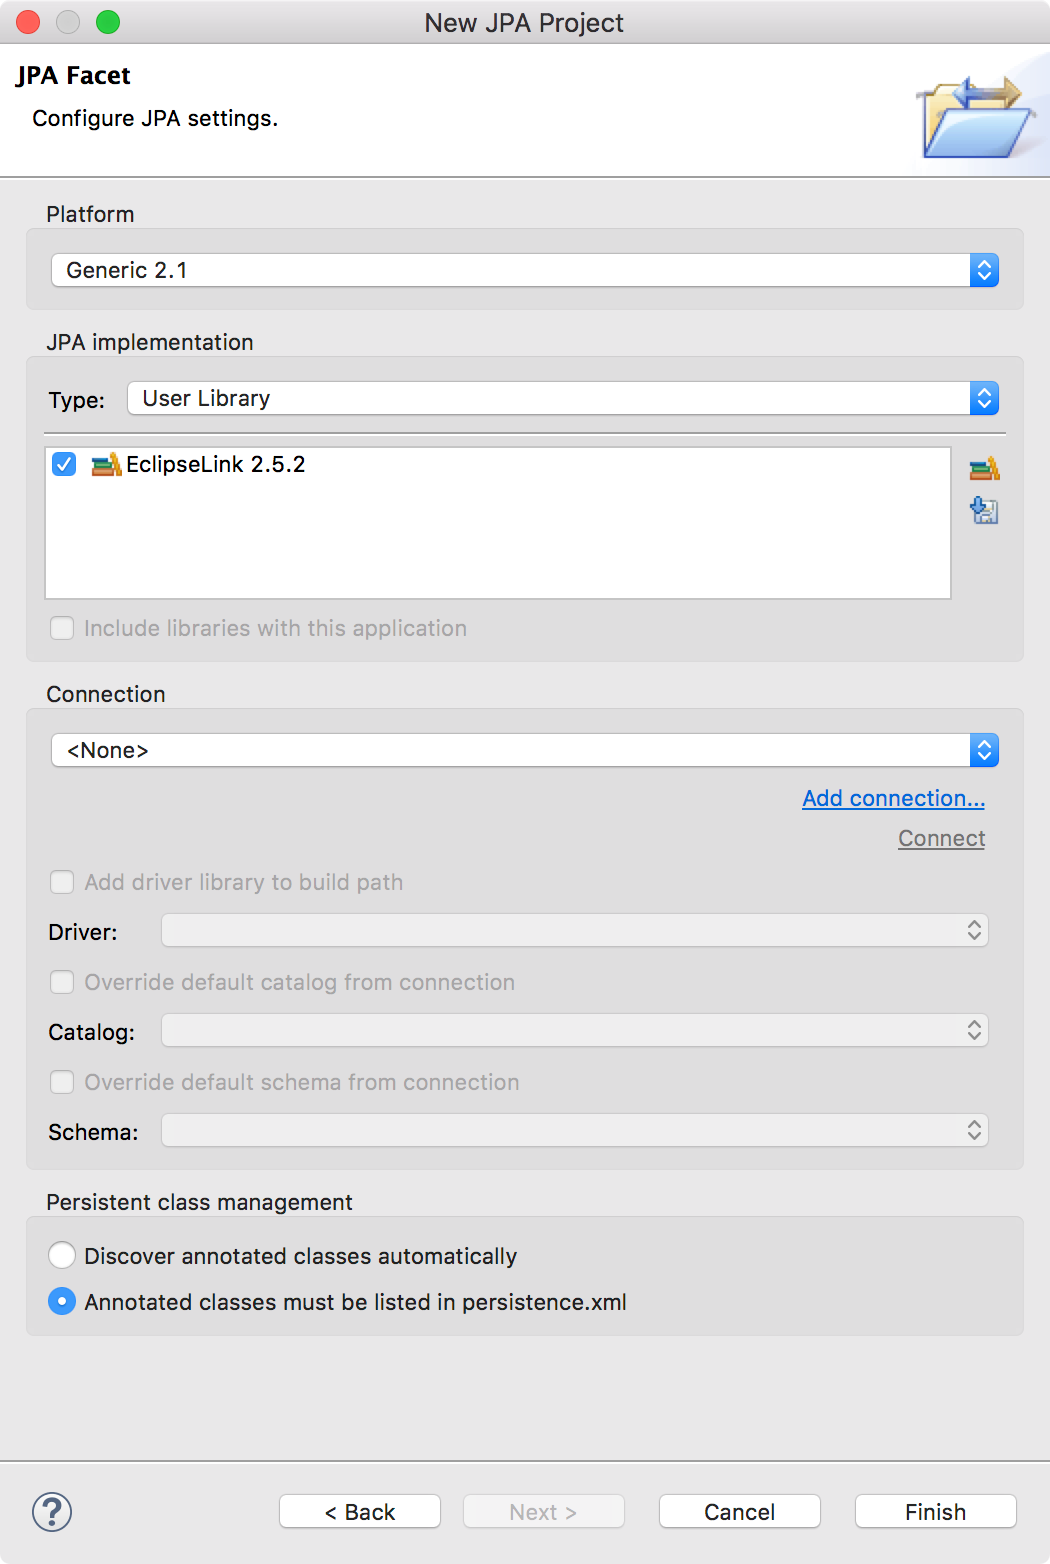
After downloading, check the box of ‘EclipseLink 2.5.2’ and click Finish.
Finally you get the JPA project in Eclipse IDE. Expand all files, you will get the folder and file hierarchy as follows:

3. Adding MySQL Connector to Project
To access MySQL database, we need mysql connector jar.
Go to https://dev.mysql.com/downloads/connector/j/5.1.html, download MySQL Connector/J(ZIP Archive).
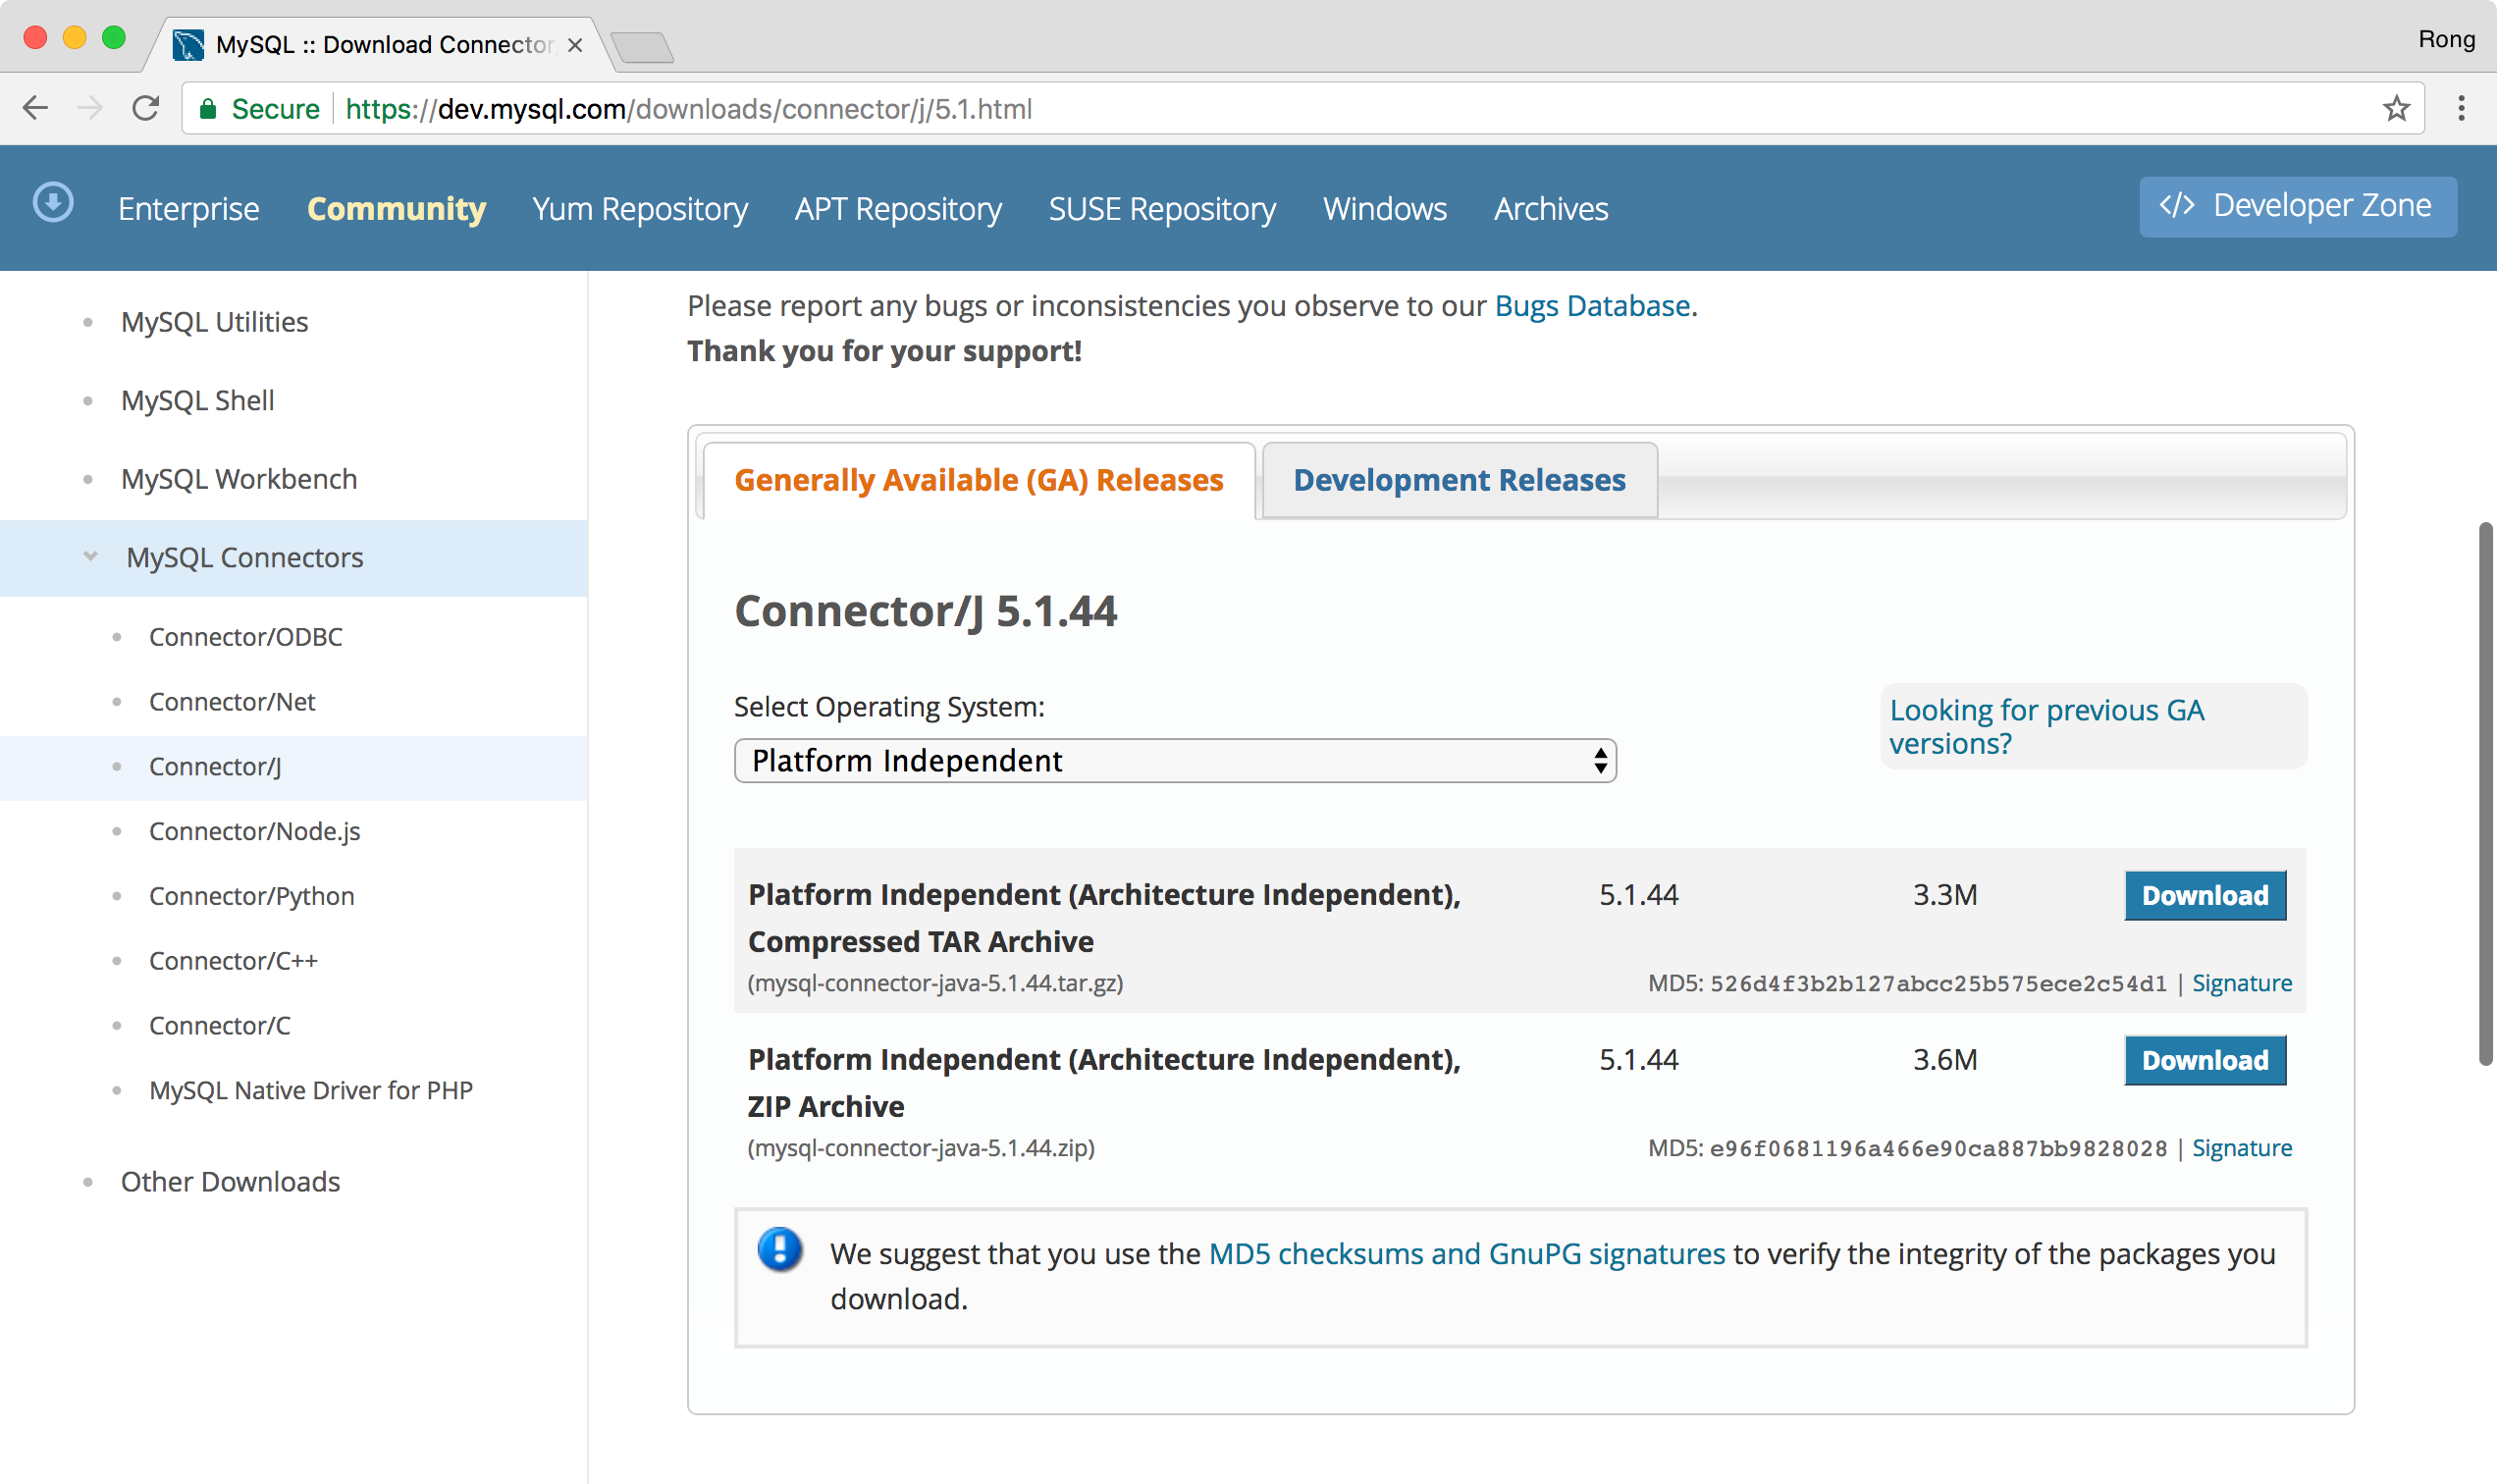
Extract mysql-connector-java-5.1.44-bin.jar from the the downloaded zip file, and copy it to /JPATutorial/lib/. In Eclipse, right click on Project -> Properties -> Java Build Path, click on ‘Add External Jars…’, add mysql connector into the build path.

4. Setting up MySQL Container
We use docker container to host our MySQL database.
4.1 Creating Dockerfile
Create a file named Dockerfile with the following content.
#Create MySQL Image for JPA Tutorial
FROM mysql
MAINTAINER csgeek@mail.com

ENV MYSQL_ROOT_PASSWORD jpa
ADD jpa_backup.sql /docker-entrypoint-initdb.d

EXPOSE 3306
Notice that we set environment variable MYSQL_ROOT_PASSWORD to jpa. Later, we can access this MySQL database with user root and password jpa. We also add jpa_backup.sql file into /docker-entrypoint-initdb.d, which means the sql scripts inside jpa_backup.sql will be executed when the MySQL container is started. There is only one line in jpa_backup.sql, just to create a database named jpadb.
CREATE DATABASE IF NOT EXISTS `jpadb`
4.2 Creating Image with Dockerfile
In Docker Terminal, navigate to /JPATutorial/Docker/, run the following command the create MySQL image.
$ docker build -t jpa-mysql:0.1 .
The new image is created with named jpa-mysql and tag 0.1.
$ docker images

4.3 Running MySQL Container
In Docker Terminal, run command to launch MySQL container with the new image ‘jpa-mysql:0.1’.
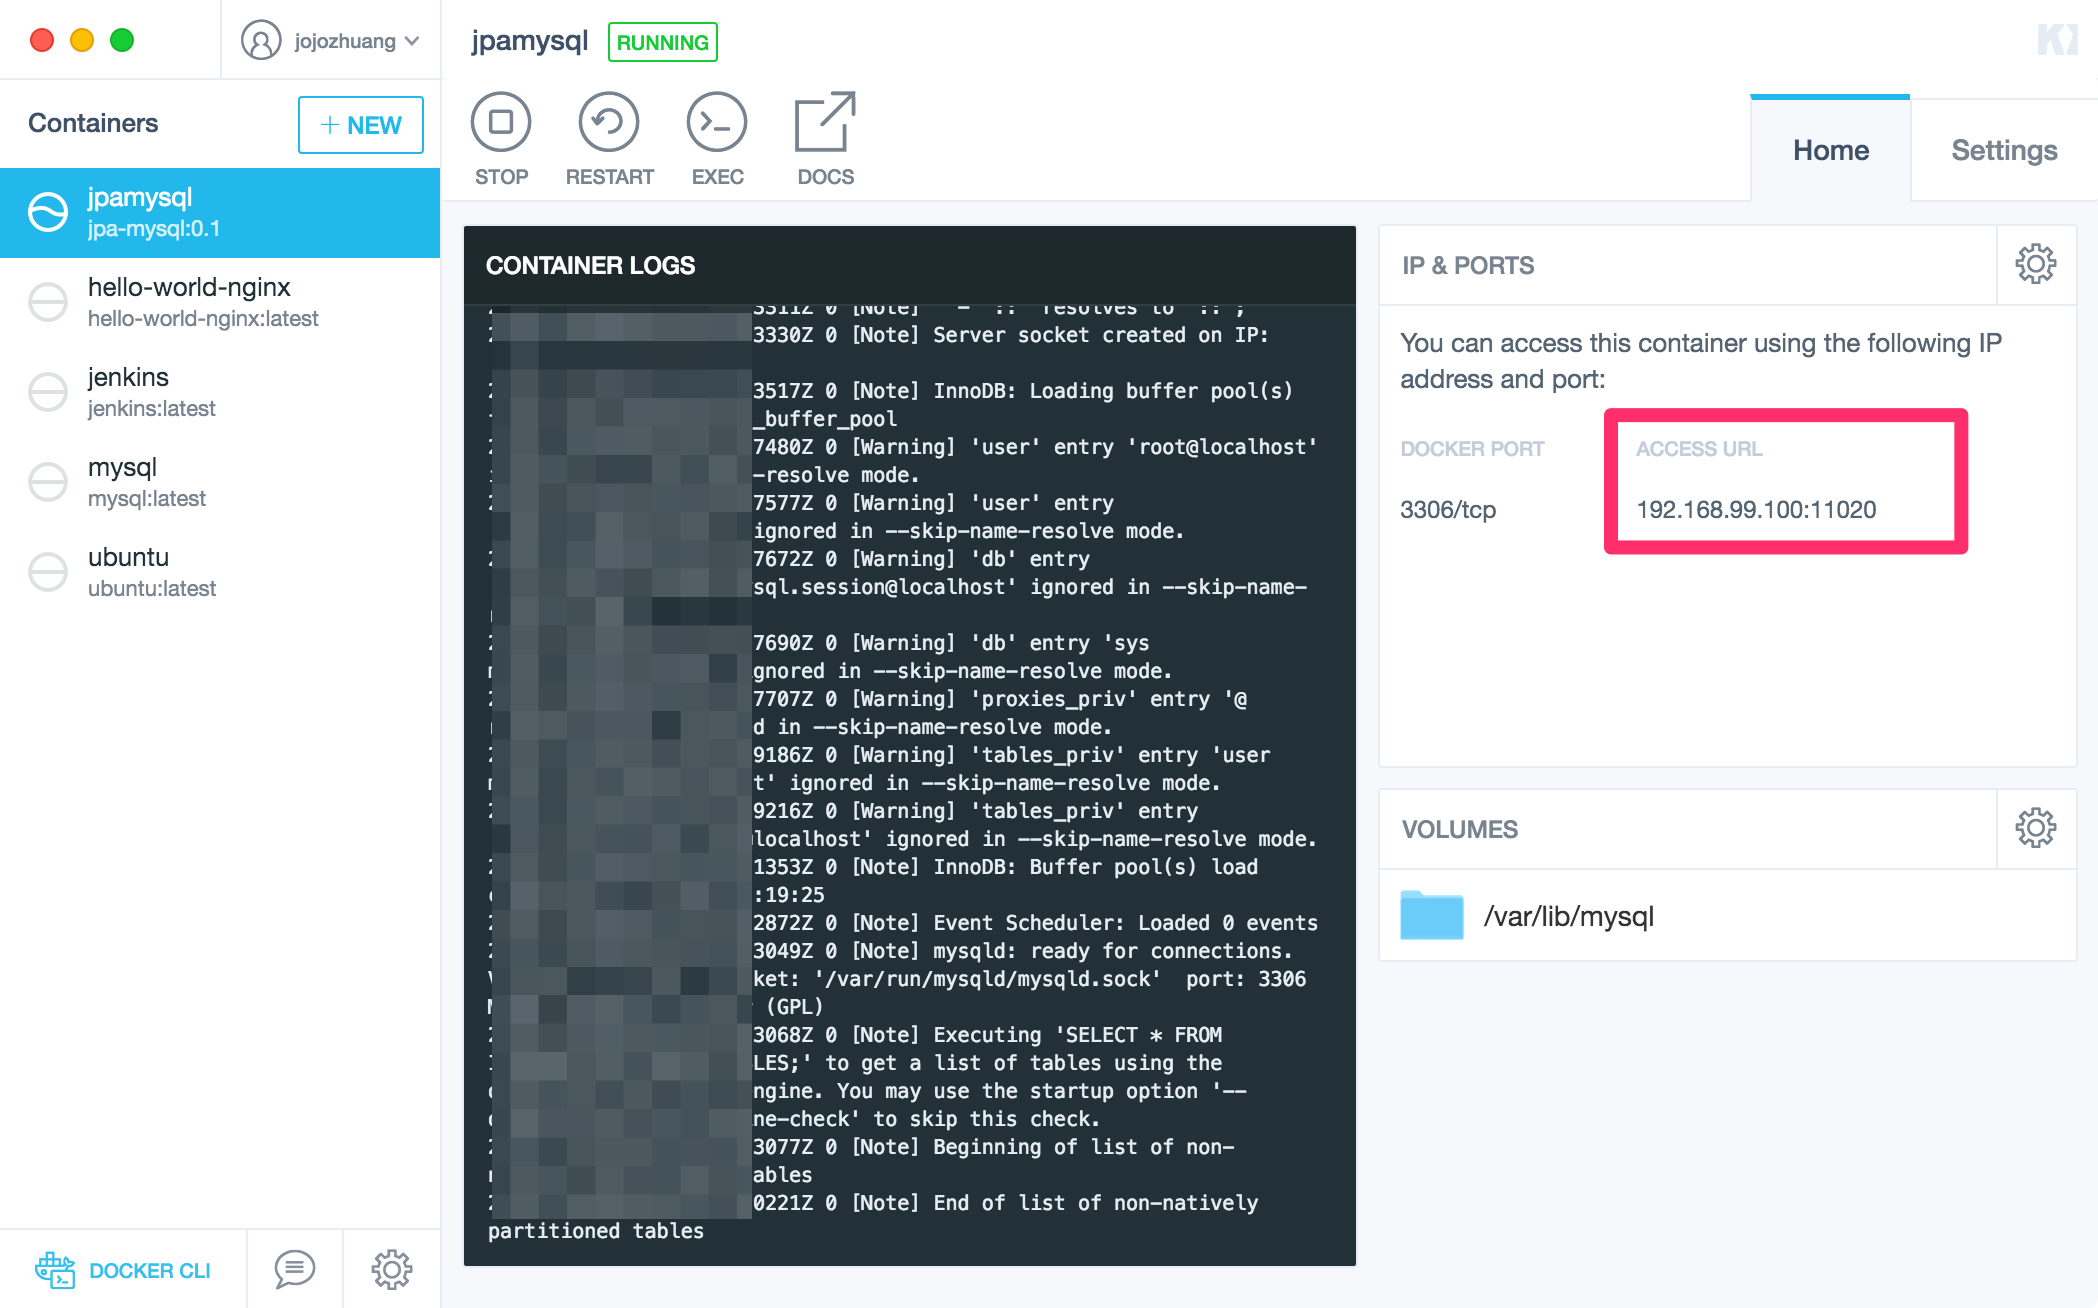
$ docker run --detach --name=jpamysql --publish 11020:3306 jpa-mysql:0.1
You will see that a container named jpamysql is running now. Note the IP address 192.168.99.100 and port 11020. We will use them to configure the database connection in eclipse and MySQL Workbench later.
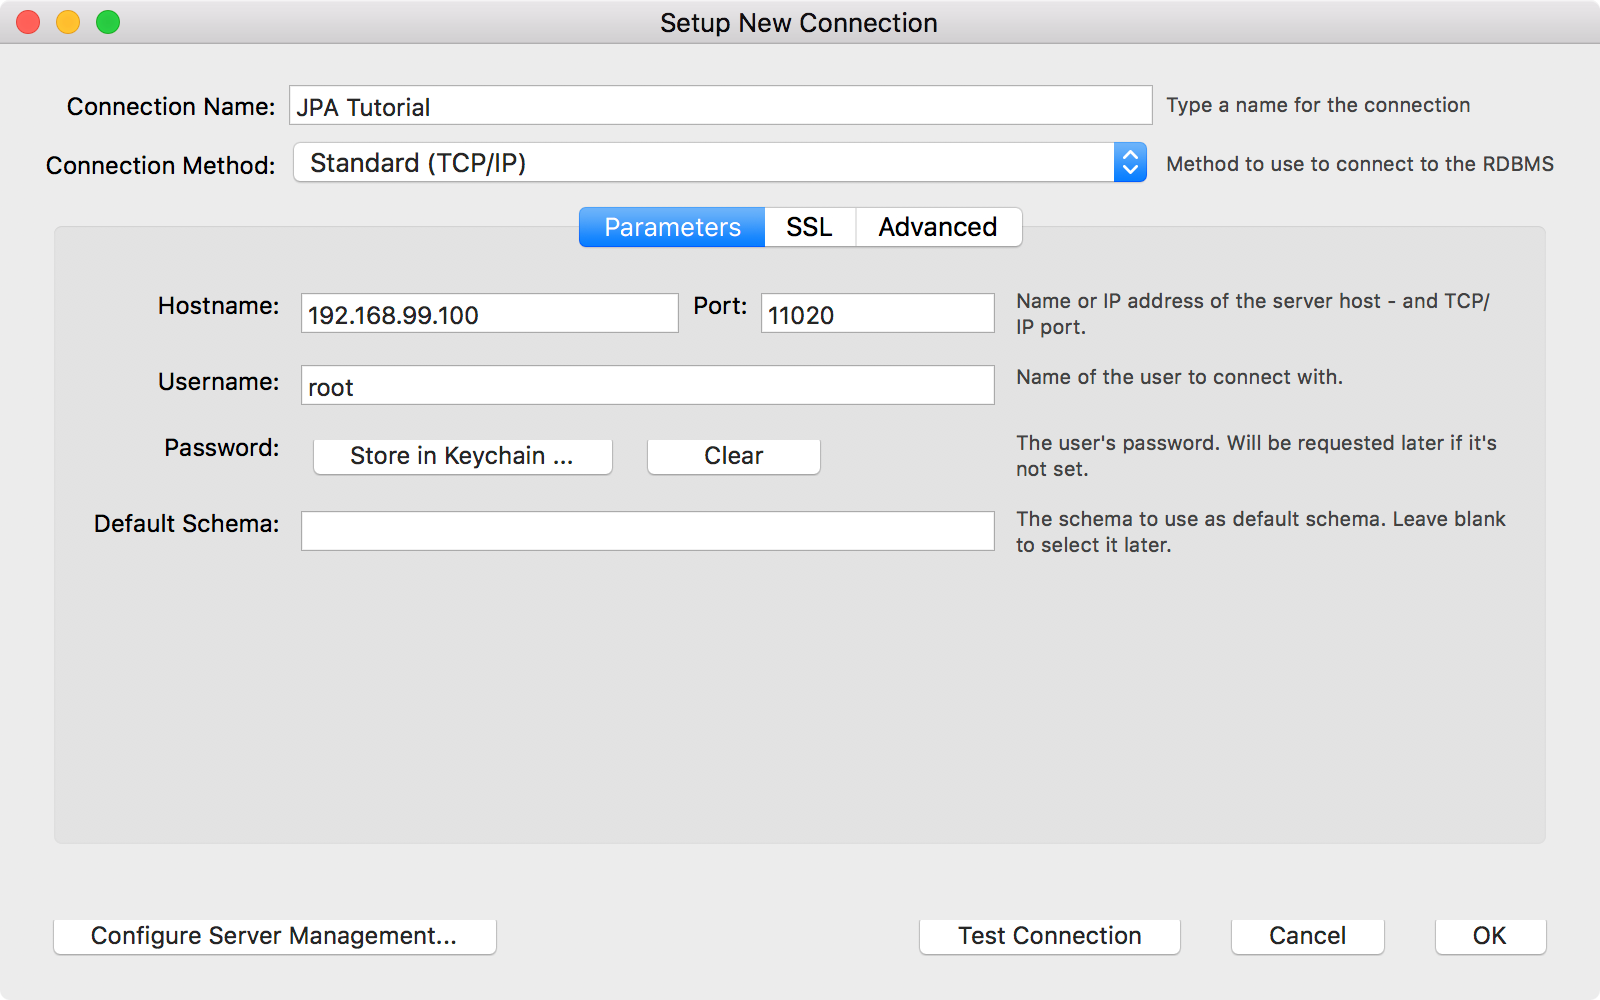
4.4 Connecting MySQL Container With MySQL Workbench
In MySQL Workbench, create a new connection with name ‘JPA Tutorial’. Set IP address to 192.168.99.100 and port to 11020. And set password jpa for user root.
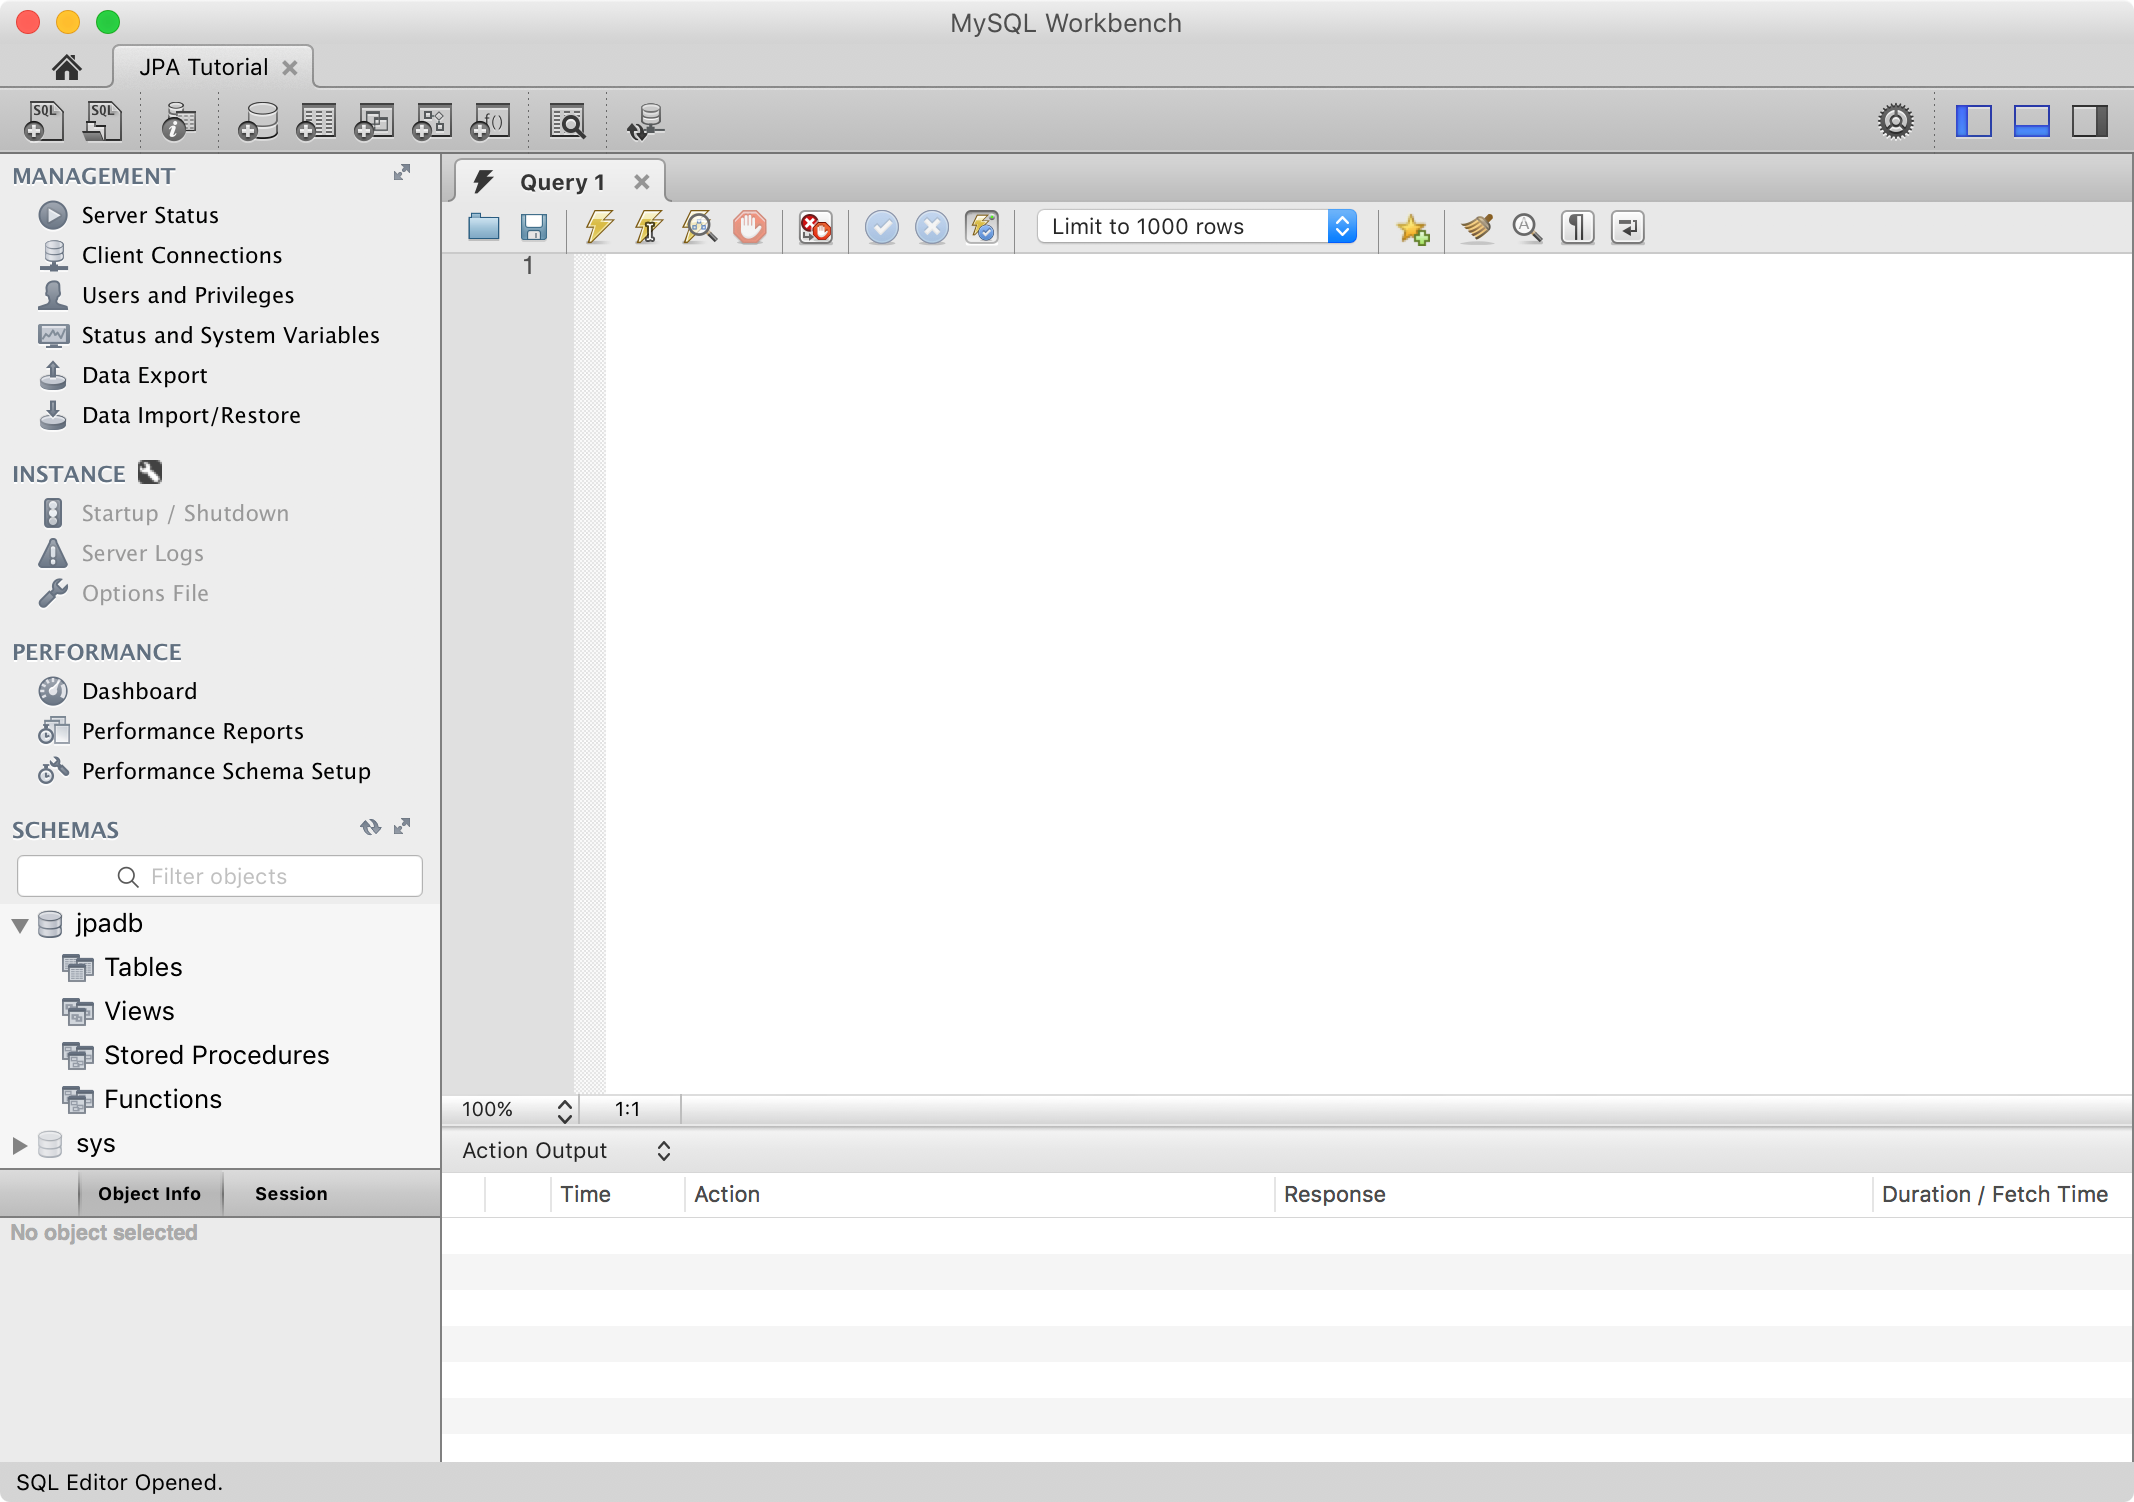
 Test the connection and connect the MySQL container. You will see there is no table created yet in database jpadb.
5. Making Changes to JPA Project
5.1 Configuring Persistence.xml
In eclipse, open Persistence.xml of JPATutorial, switch to source view. Edit it as follows:
<?xml version="1.0" encoding="UTF-8"?>
<persistence version="2.1" xmlns="http://xmlns.jcp.org/xml/ns/persistence" xmlns:xsi="http://www.w3.org/2001/XMLSchema-instance" xsi:schemaLocation="http://xmlns.jcp.org/xml/ns/persistence http://xmlns.jcp.org/xml/ns/persistence/persistence_2_1.xsd">
    <persistence-unit name="JPATutorial">
        <class>Johnny.JPATutorial.Entity.Employee</class>

        <properties>
           <property name="javax.persistence.jdbc.url" value="jdbc:mysql://192.168.99.100:11020/jpadb"/>
           <property name="javax.persistence.jdbc.user" value="root"/>
           <property name="javax.persistence.jdbc.password" value="jpa"/>
           <property name="javax.persistence.jdbc.driver" value="com.mysql.jdbc.Driver"/>
           <property name="eclipselink.logging.level" value="FINE"/>
           <property name="eclipselink.ddl-generation" value="create-tables"/>
        </properties>
    </persistence-unit>
</persistence>
5.2 Creating Entity
Create a package named Johnny.JPATutorial.Entity, under ‘src’ (Source) package.
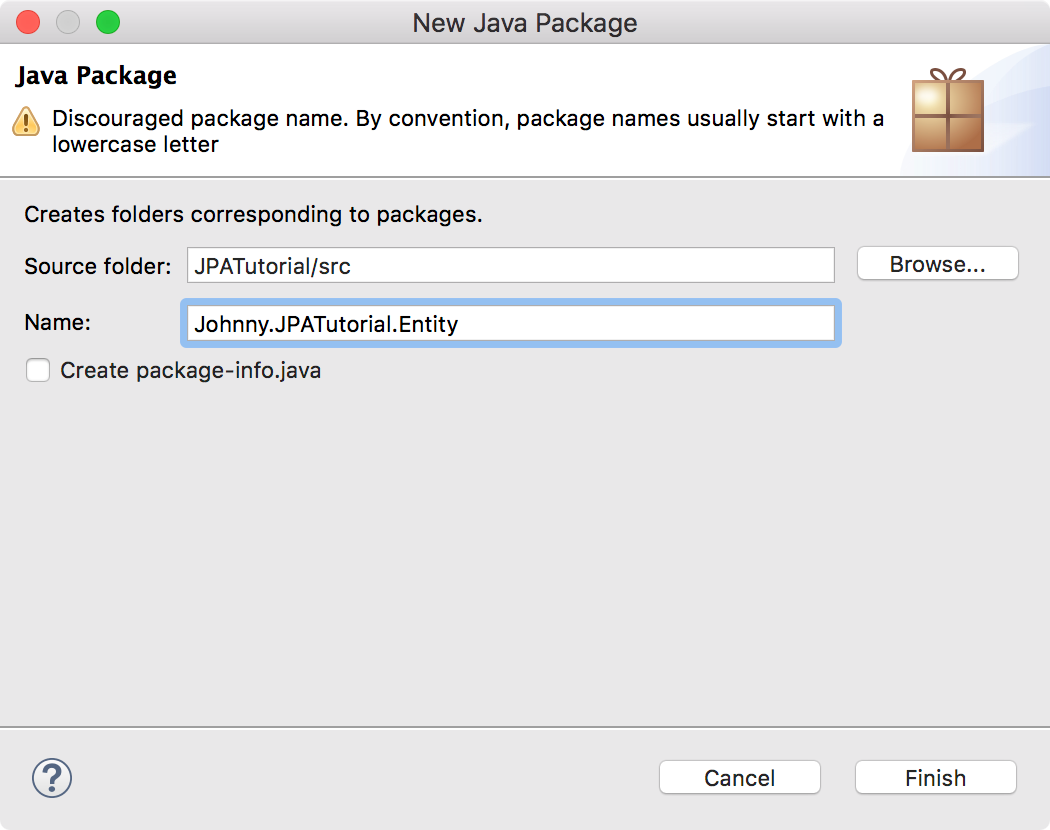
Create a class named Employee.java under given package as follows:
package Johnny.JPATutorial.Entity;

import javax.persistence.Entity;
import javax.persistence.GeneratedValue;
import javax.persistence.GenerationType;
import javax.persistence.Id;
import javax.persistence.Table;

@Entity
@Table
public class Employee {
    @Id
    @GeneratedValue(strategy = GenerationType.AUTO)

    private int eid;
    private String ename;
    private double salary;
    private String deg;

    public Employee(int eid, String ename, double salary, String deg) {
       super( );
       this.eid = eid;
       this.ename = ename;
       this.salary = salary;
       this.deg = deg;
    }

    public Employee( ) {
       super();
    }

    public int getEid( ) {
        return eid;
    }

    public void setEid(int eid) {
       this.eid = eid;
    }

    public String getEname( ) {
       return ename;
    }

    public void setEname(String ename) {
       this.ename = ename;
    }

    public double getSalary( ) {
       return salary;
    }

    public void setSalary(double salary) {
       this.salary = salary;
    }

    public String getDeg( ) {
       return deg;
    }

    public void setDeg(String deg) {
       this.deg = deg;
    }

    @Override
    public String toString() {
       return "Employee [eid=" + eid + ", ename=" + ename + ", salary=" + salary + ", deg=" + deg + "]";
    }
}
5.3 Creating Persistence Operations
Create another package named Johnny.JPATutorial.Service, under ‘src’ (source) package.
Create CreateEmployee.java
package Johnny.JPATutorial.Service;

import javax.persistence.EntityManager;
import javax.persistence.EntityManagerFactory;
import javax.persistence.Persistence;

import Johnny.JPATutorial.Entity.Employee;

public class CreateEmployee {
    public static void main(String[] args) {

        EntityManagerFactory emfactory = Persistence.createEntityManagerFactory("JPATutorial");

        EntityManager entitymanager = emfactory.createEntityManager();
        entitymanager.getTransaction().begin();

        Employee employee = new Employee();
        employee.setEid(1001);
        employee.setEname("Johnny");
        employee.setSalary(40000);
        employee.setDeg("Technical Manager");

        entitymanager.persist(employee);
        entitymanager.getTransaction().commit();

        entitymanager.close();
        emfactory.close();
    }
}
Create UpdateEmployee.java
package Johnny.JPATutorial.Service;

import javax.persistence.EntityManager;
import javax.persistence.EntityManagerFactory;
import javax.persistence.Persistence;

import Johnny.JPATutorial.Entity.Employee;

public class UpdateEmployee {
    public static void main(String[] args) {
        EntityManagerFactory emfactory = Persistence.createEntityManagerFactory("JPATutorial");

        EntityManager entitymanager = emfactory.createEntityManager();
        entitymanager.getTransaction().begin();
        Employee employee = entitymanager.find(Employee.class, 1001);

        // before update
        System.out.println(employee);
        employee.setSalary(86000);
        entitymanager.getTransaction().commit();

        // after update
        System.out.println(employee);
        entitymanager.close();
        emfactory.close();
    }
}
Create FindEmployee.java
package Johnny.JPATutorial.Service;

import javax.persistence.EntityManager;
import javax.persistence.EntityManagerFactory;
import javax.persistence.Persistence;

import Johnny.JPATutorial.Entity.Employee;

public class FindEmployee {
    public static void main(String[] args) {

        EntityManagerFactory emfactory = Persistence.createEntityManagerFactory("JPATutorial");
        EntityManager entitymanager = emfactory.createEntityManager();
        Employee employee = entitymanager.find(Employee.class, 1001);

        System.out.println("employee ID = " + employee.getEid());
        System.out.println("employee NAME = " + employee.getEname());
        System.out.println("employee SALARY = " + employee.getSalary());
        System.out.println("employee DESIGNATION = " + employee.getDeg());
    }
}
Create DeleteEmployee.java
package Johnny.JPATutorial.Service;

import javax.persistence.EntityManager;
import javax.persistence.EntityManagerFactory;
import javax.persistence.Persistence;

import Johnny.JPATutorial.Entity.Employee;

public class DeleteEmployee {
    public static void main(String[] args) {

        EntityManagerFactory emfactory = Persistence.createEntityManagerFactory("JPATutorial");
        EntityManager entitymanager = emfactory.createEntityManager();
        entitymanager.getTransaction().begin();

        Employee employee = entitymanager.find(Employee.class, 1001);
        entitymanager.remove(employee);
        entitymanager.getTransaction().commit();
        entitymanager.close();
        emfactory.close();
    }
}
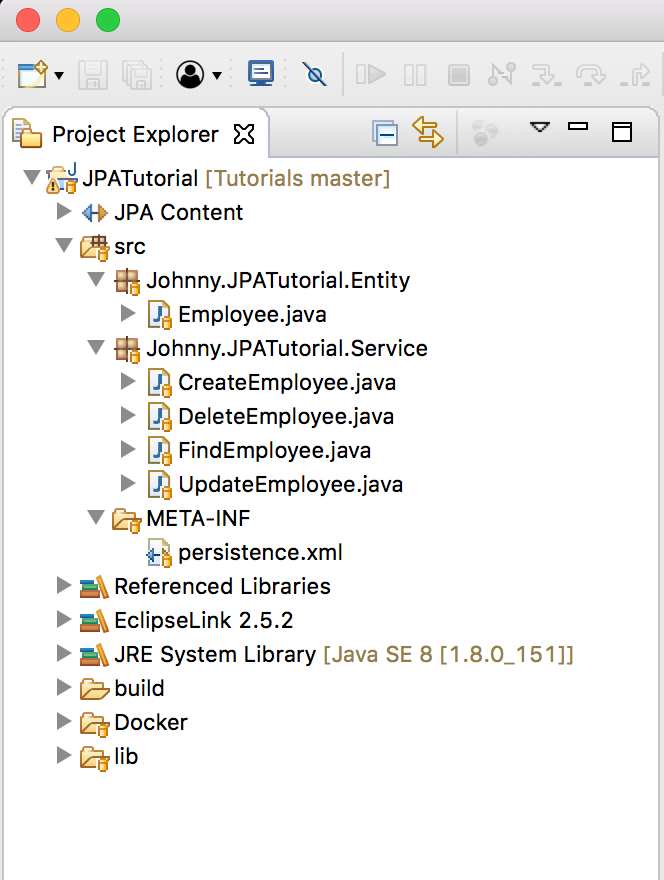
5.4 Final Project Structure
Finally, the project looks as follows.
6. Testing
6.1 Running CreateEmployee Method
In Eclipse, right click on CreateEmployee.java file -> Run AS -> Java Application. You will get notifications from Eclipselink library on the console panel of eclipse IDE.
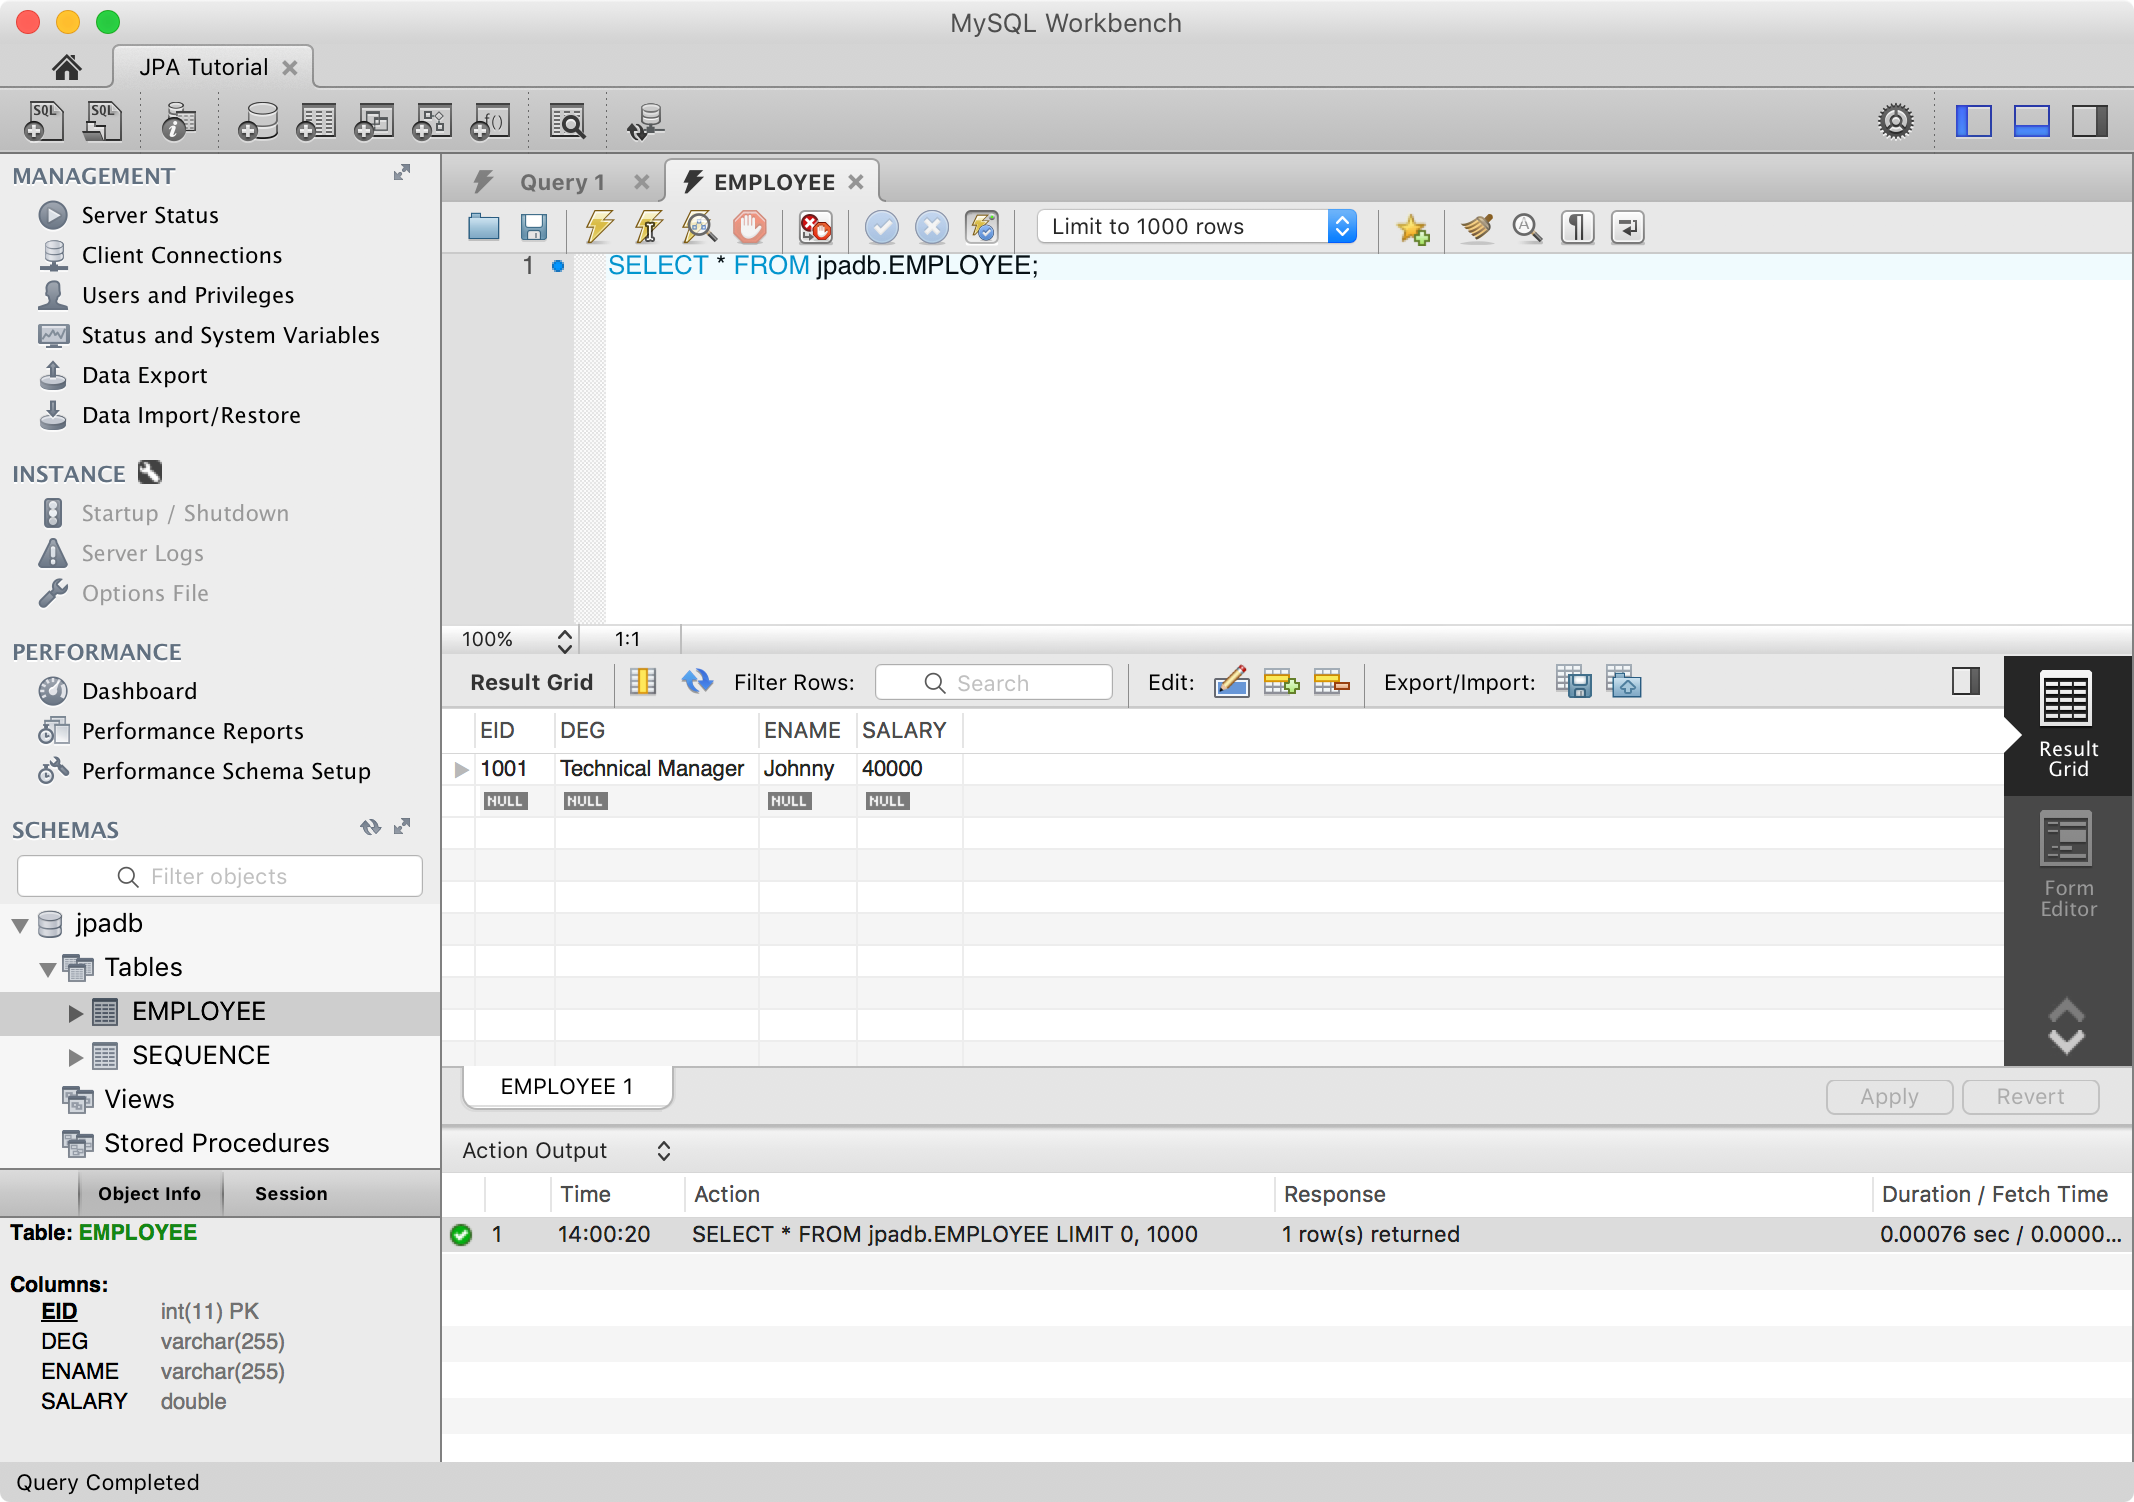
6.2 Checking Data
In MySQL Workbench, refresh database jpadb, you will see table EMPLOYEE is created. Run sql query to find all rows in the Employee table. You will see one new entry has been created.
SELECT * FROM jpadb.EMPLOYEE;
We see the row for new employee is there.
Test updating, finding and deleting with the same approach. Data should always get updated properly in mysql.
7. Other Topics
- JPQL
- Entity Relationships
- Criteria API