8533. Building iOS App with XamarinXamarin, Xcode, SQLite, and C#
Tutorial for how to build iOS App with Xamarin and C#.
1. iOS App
1.1 Requirement
We will create an app named ‘Game Store’ to manage products. It has the similar layout and functions with the app we created with Xcode and Swift. See more details in the posting Building iOS App with Xcode.
1.2 Creating Project
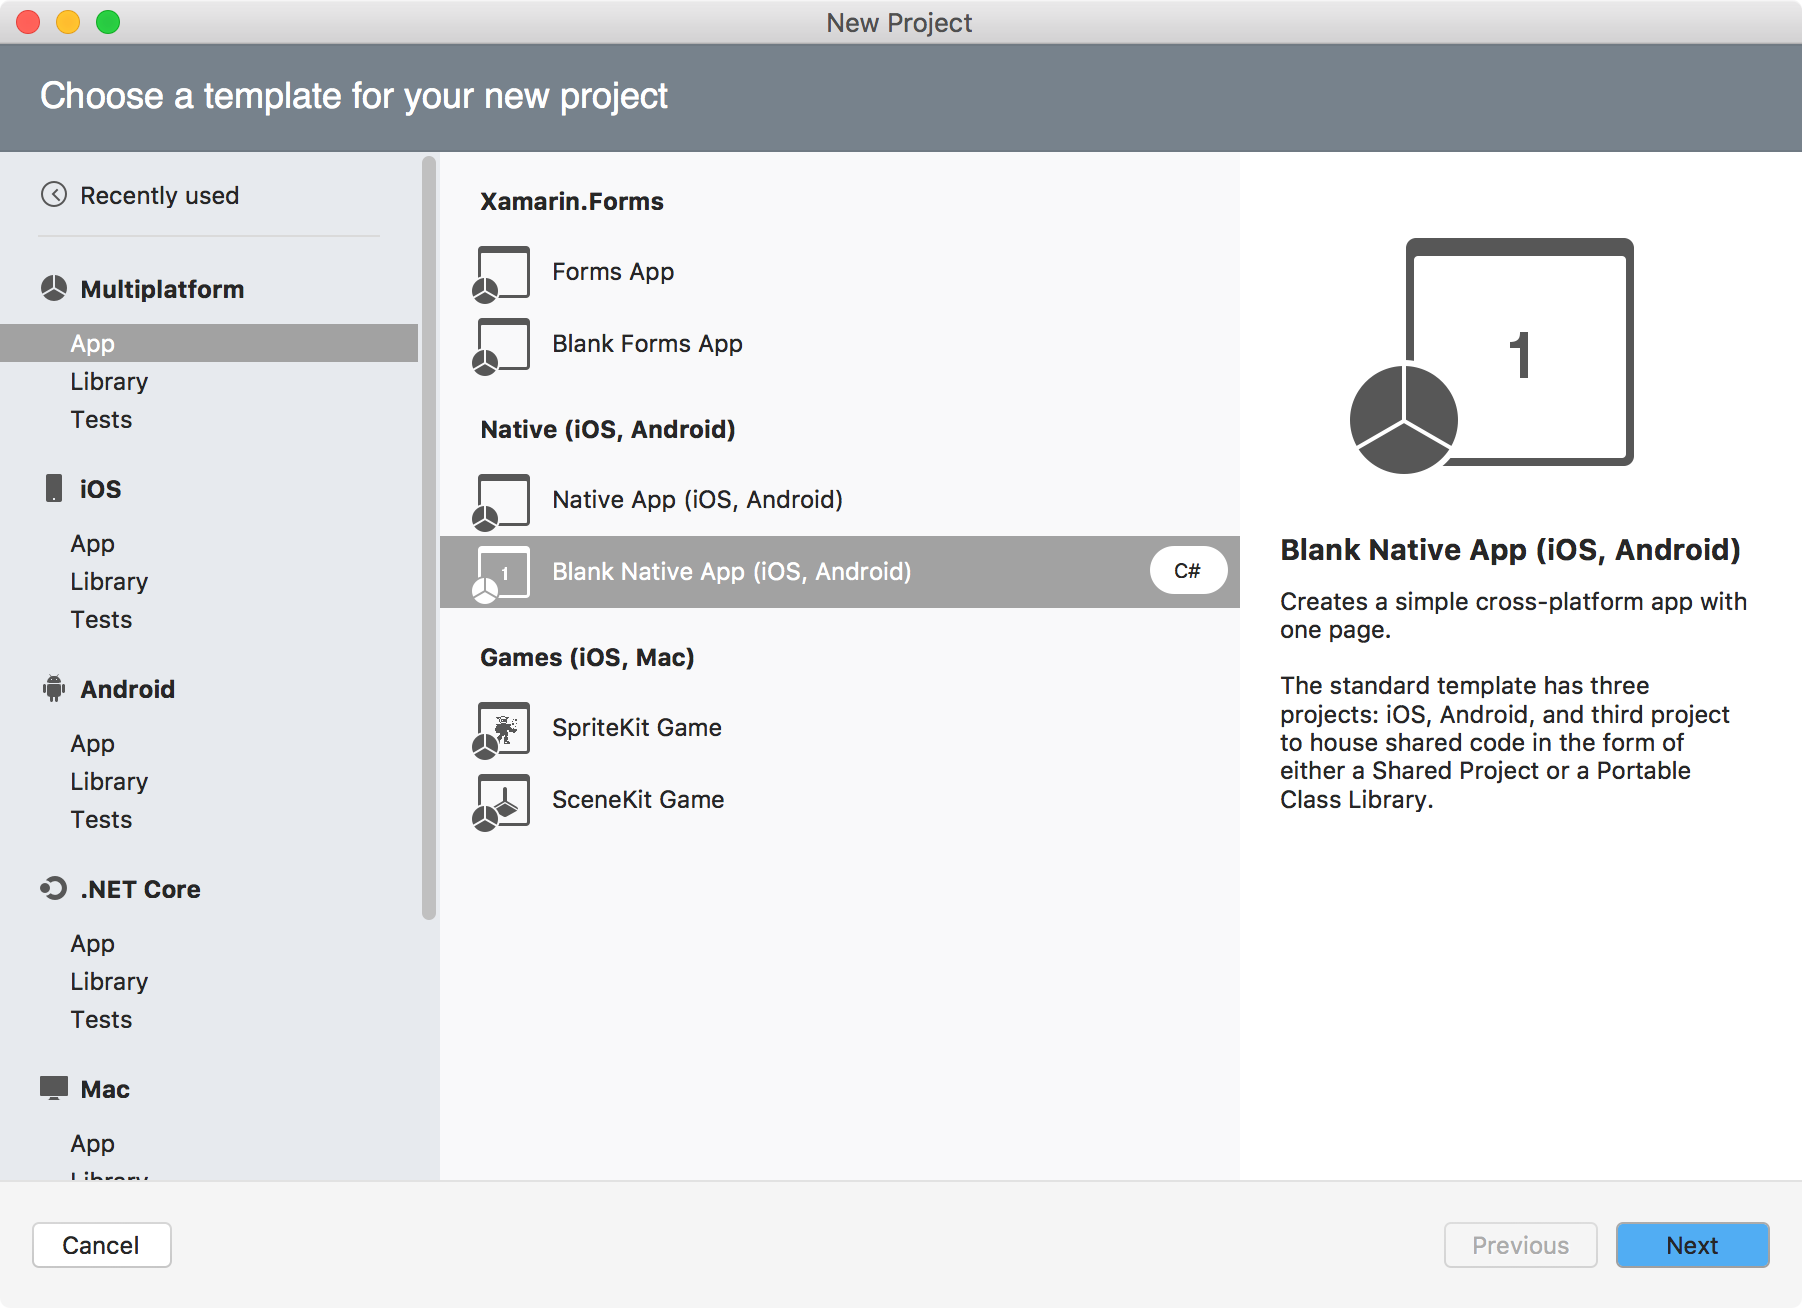
In Visual Studio, File->New Solution, select Multiplatform->App->Blank Native App(iOS, Android), Next.
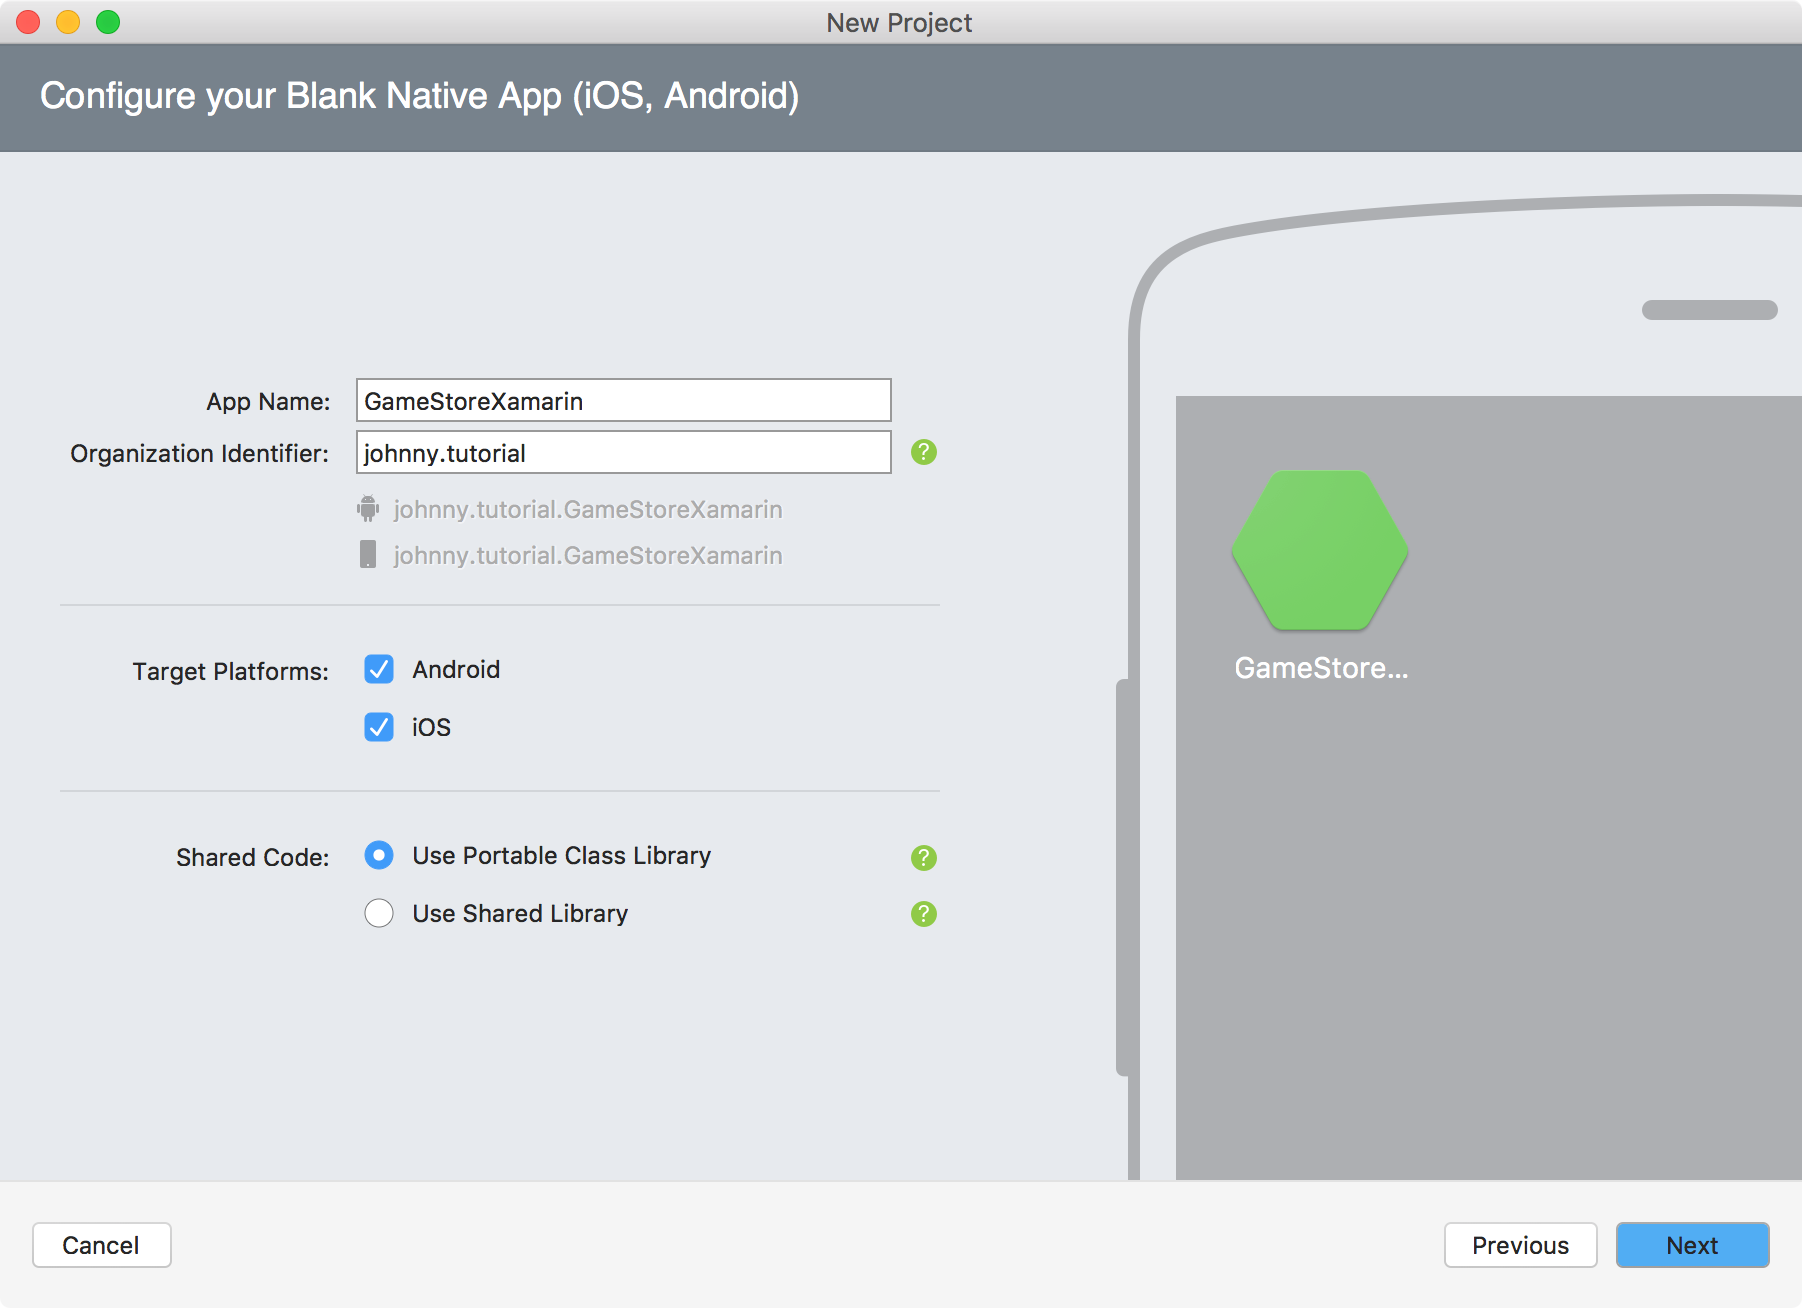
Specify the name and Organization Identifier, Next.
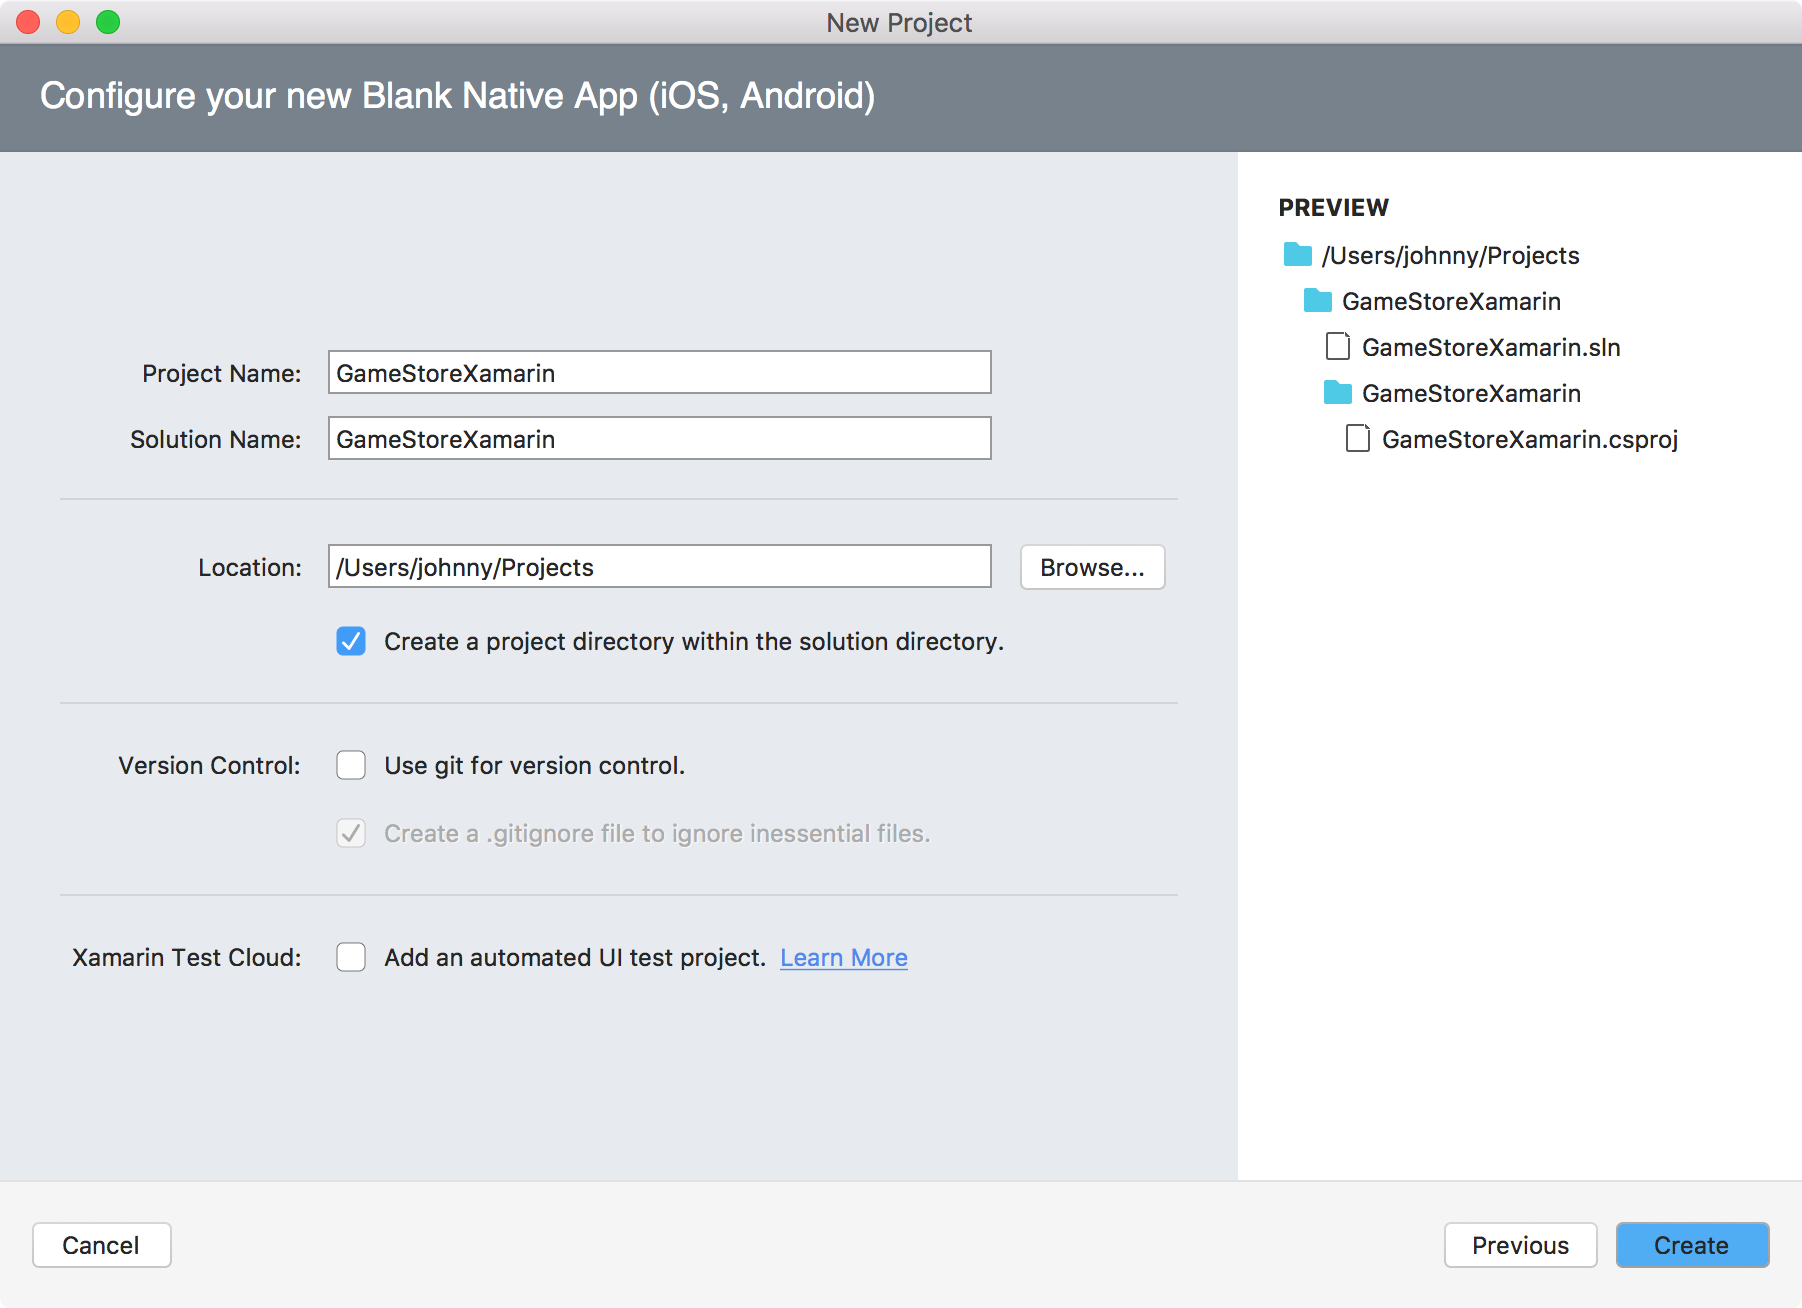
Specify the location where the source files locate, Create.
One solution and three projects are created. ‘GameStoreXamarin’ is a Portable .NET project, which contains common functions. ‘GameStoreXamarin.Droid’ and ‘GameStoreXamarin.iOS’ are specifically responsible for UI, one for Android and another for iOS.

Rename the project ‘GameStoreXamarin’ to ‘GameStoreXamarin.Core’. And Rename project ‘GameStoreXamarin.Droid’ to ‘GameStoreXamarin.Android’.
2. Portable Project
We will use SQLite to store data for this app. And all of the core database operations are in this portable project. Later, it will be shared to iOS project and Android project. This portable project is re-usable.
2.1 Installing Packages
Select the ‘GameStoreXamarin.Core’ project, Project->Add NuGet Package, then NuGet Package Manager will be opened.
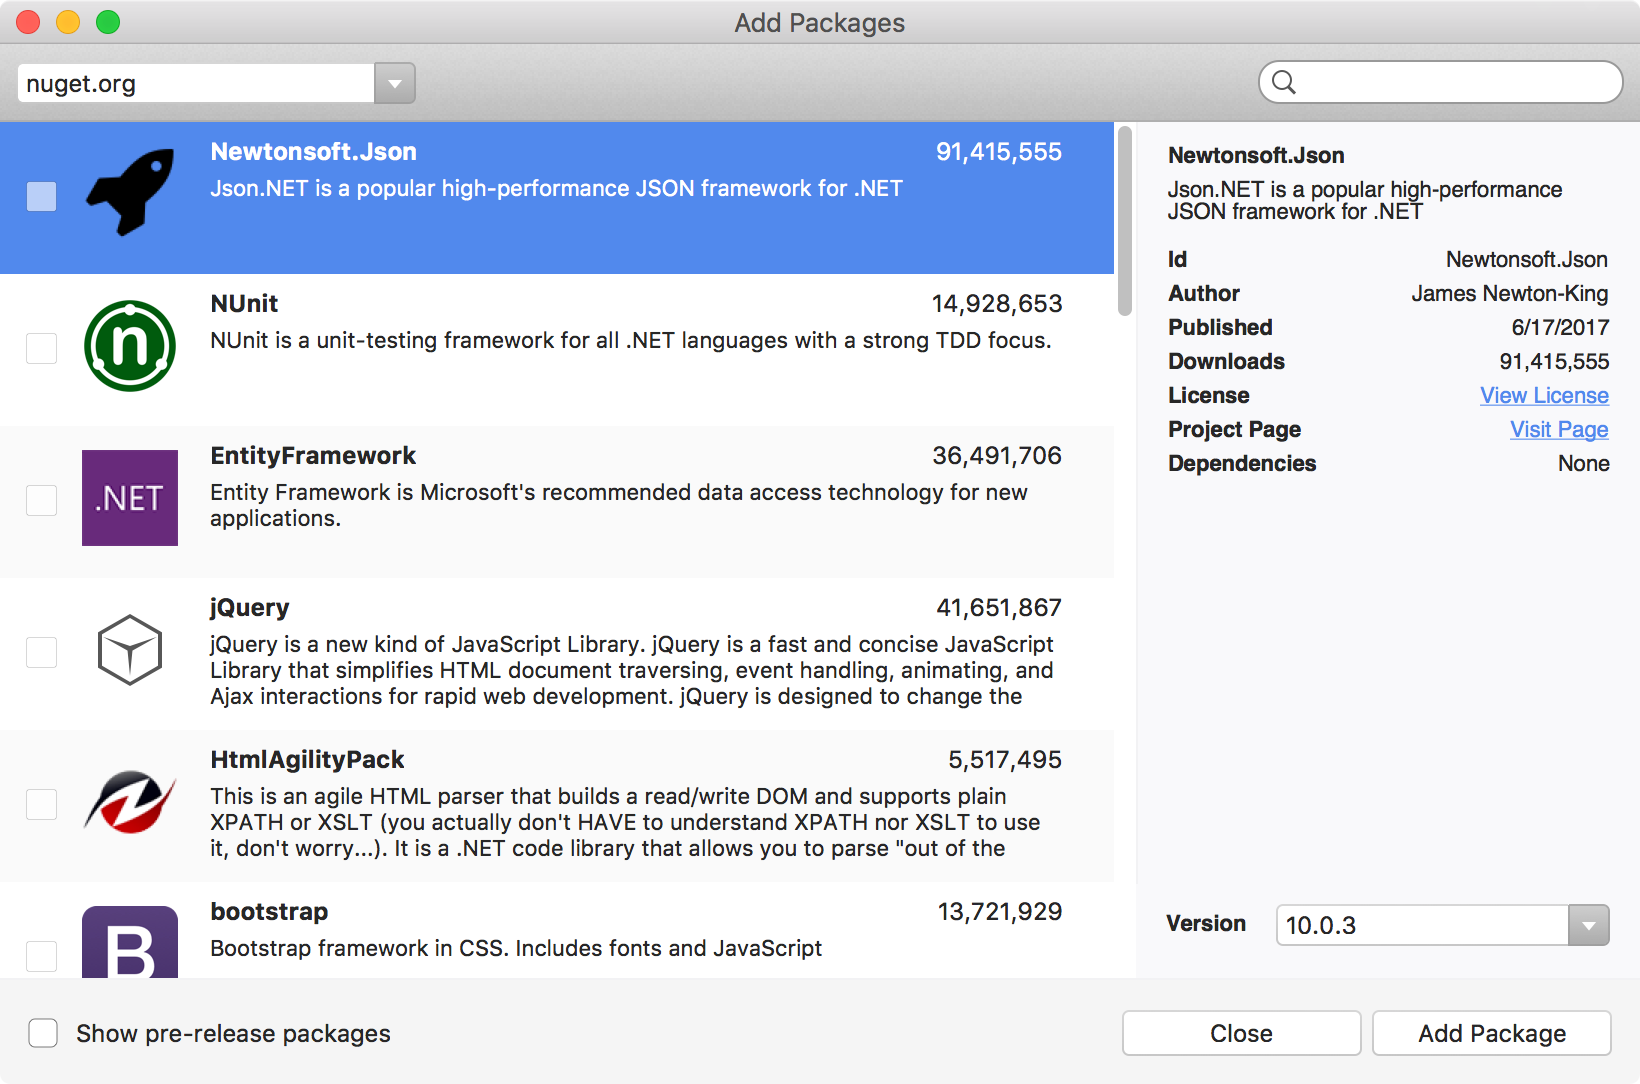
Search ‘sqlite’, select the package named ‘sqlite-net-pcl’, click ‘Add Package’.
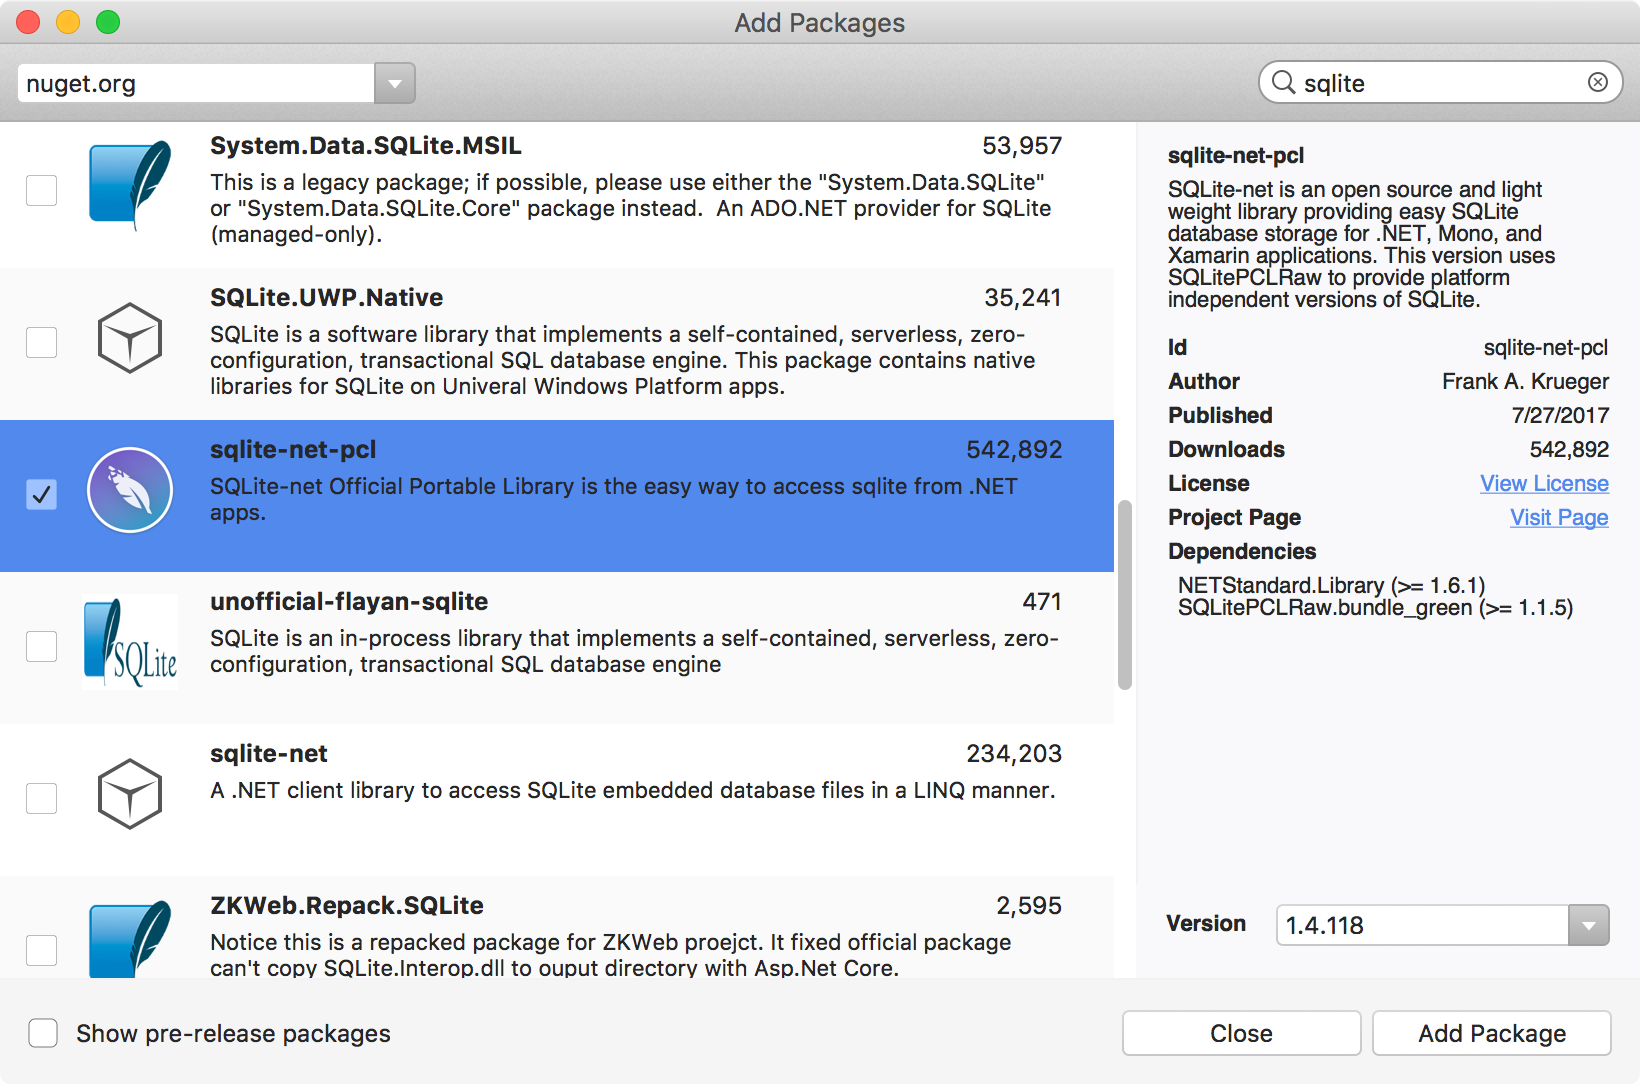
The selected package will be installed to current project. A new file named ‘package.config’ is added to the project. sqlite and its dependencies will be listed in this file.
<?xml version="1.0" encoding="utf-8"?>
<packages>
  <package id="sqlite-net-pcl" version="1.4.118" targetFramework="portable45-net45+win8+wpa81" />
  <package id="SQLitePCLRaw.bundle_green" version="1.1.9" targetFramework="portable45-net45+win8+wpa81" />
  <package id="SQLitePCLRaw.core" version="1.1.9" targetFramework="portable45-net45+win8+wpa81" />
</packages>
Install another package named ‘Xamarin.Forms’. Notice that, new packages are installed into the project’s Packages folder. After the installation, you can include them into your project with ‘using’ keyword.
2.2 Creating Classes
Create a folder named ‘Models’ under the project, and create a file named ‘Product.cs’. We defined four properties for each product, id, name, price and a photo of the product.
using SQLite;

namespace GameStoreXamarin.Core.Models
{
    public class Product
    {
        [PrimaryKey, AutoIncrement]
        public int ProductId { get; set; }
        public string ProductName { get; set; }
        public double Price { get; set; }
        public byte[] Image { get; set; }
    }
}
Create an interface named ‘IFileHelper.cs’. This interface defines a method ‘GetLocalFilePath()’ to get the location where the SQLite database file is stored on iOS or Android.
using System;
namespace GameStoreXamarin.Core
{
    public interface IFileHelper
    {
        string GetLocalFilePath(string filename);
    }
}
Create a folder named ‘Data’ under the project, and create a file named ‘GameStoreDatabase.cs’. This class defines the CRUD operations on SQLite.
using System;
using System.Collections.Generic;
using System.Threading.Tasks;
using GameStoreXamarin.Core.Models;
using SQLite;

namespace GameStoreXamarin.Core.Data
{
    public class GameStoreDatabase
    {
        private readonly SQLiteConnection database;
        private String TABLE_NAME = "Product";

        public GameStoreDatabase(string dbPath)
        {
            database = new SQLiteConnection(dbPath);
            database.CreateTable<Product>();
        }

        public List<Product> GetProducts()
        {
            return database.Query<Product>("SELECT * FROM [" + TABLE_NAME + "]");
        }

        public Product GetProduct(int id)
        {
            return database.Table<Product>().Where(i => i.ProductId == id).FirstOrDefault();
        }

        public int SaveProduct(Product product)
        {
            if (product.ProductId != 0)
            {
                return database.Update(product);
            }
            else
            {
                return database.Insert(product);
            }
        }

        public int DeleteProduct(int id)
        {
            Product product = GetProduct(id);
            return database.Delete(product);
        }

        public int DeleteProduct(Product product)
        {
            return database.Delete(product);
        }
    }
}
In ‘Data’ folder, create another class named ‘DatabaseHelper.cs’. Use the singleton pattern to create database instance. Notice we use ‘DependencyService’ to get the location of database file.
using System;
using GameStoreXamarin.Core;
using GameStoreXamarin.Core.Data;
using Xamarin.Forms;

namespace GameStoreXamarin.Core.Data
{
    public static class DatabaseHelper
    {
        static GameStoreDatabase database;

        public static GameStoreDatabase Database
        {
            get
            {
                if (database == null)
                {
                    String path = DependencyService.Get<IFileHelper>().GetLocalFilePath("GameStoreSQLite.db3");
                    database = new GameStoreDatabase(path);
                }
                return database;
            }
        }
    }
}
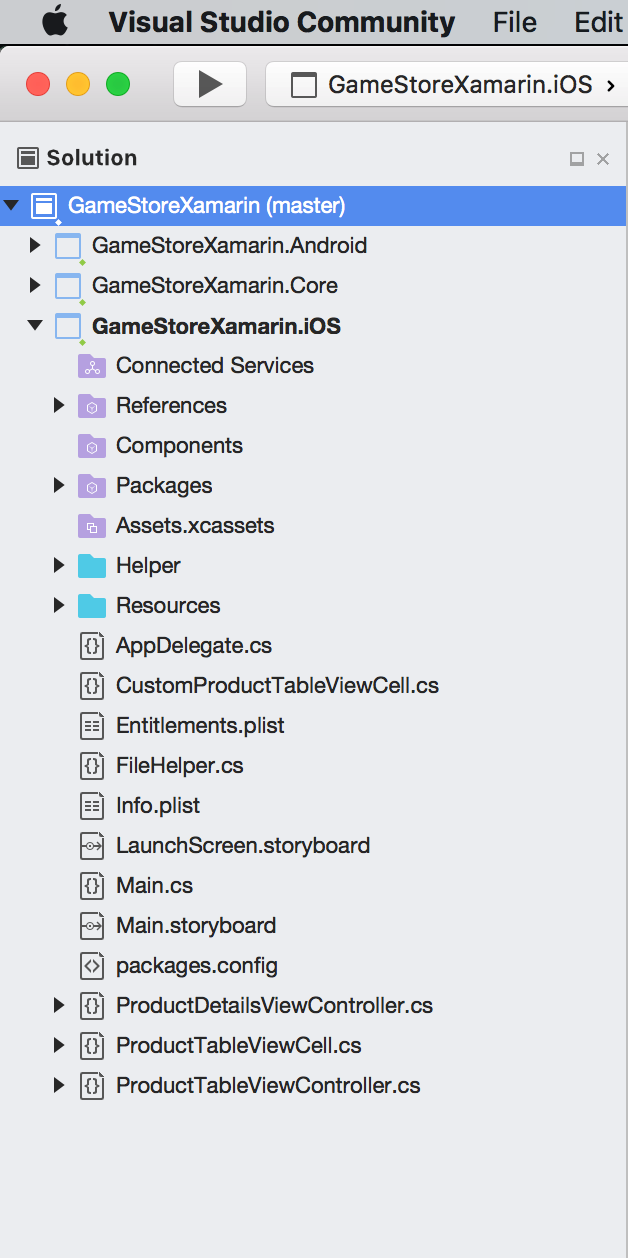
2.3 Final Project Structure
The final structure of the portable project.

3. iOS Project
3.1 Creating Views
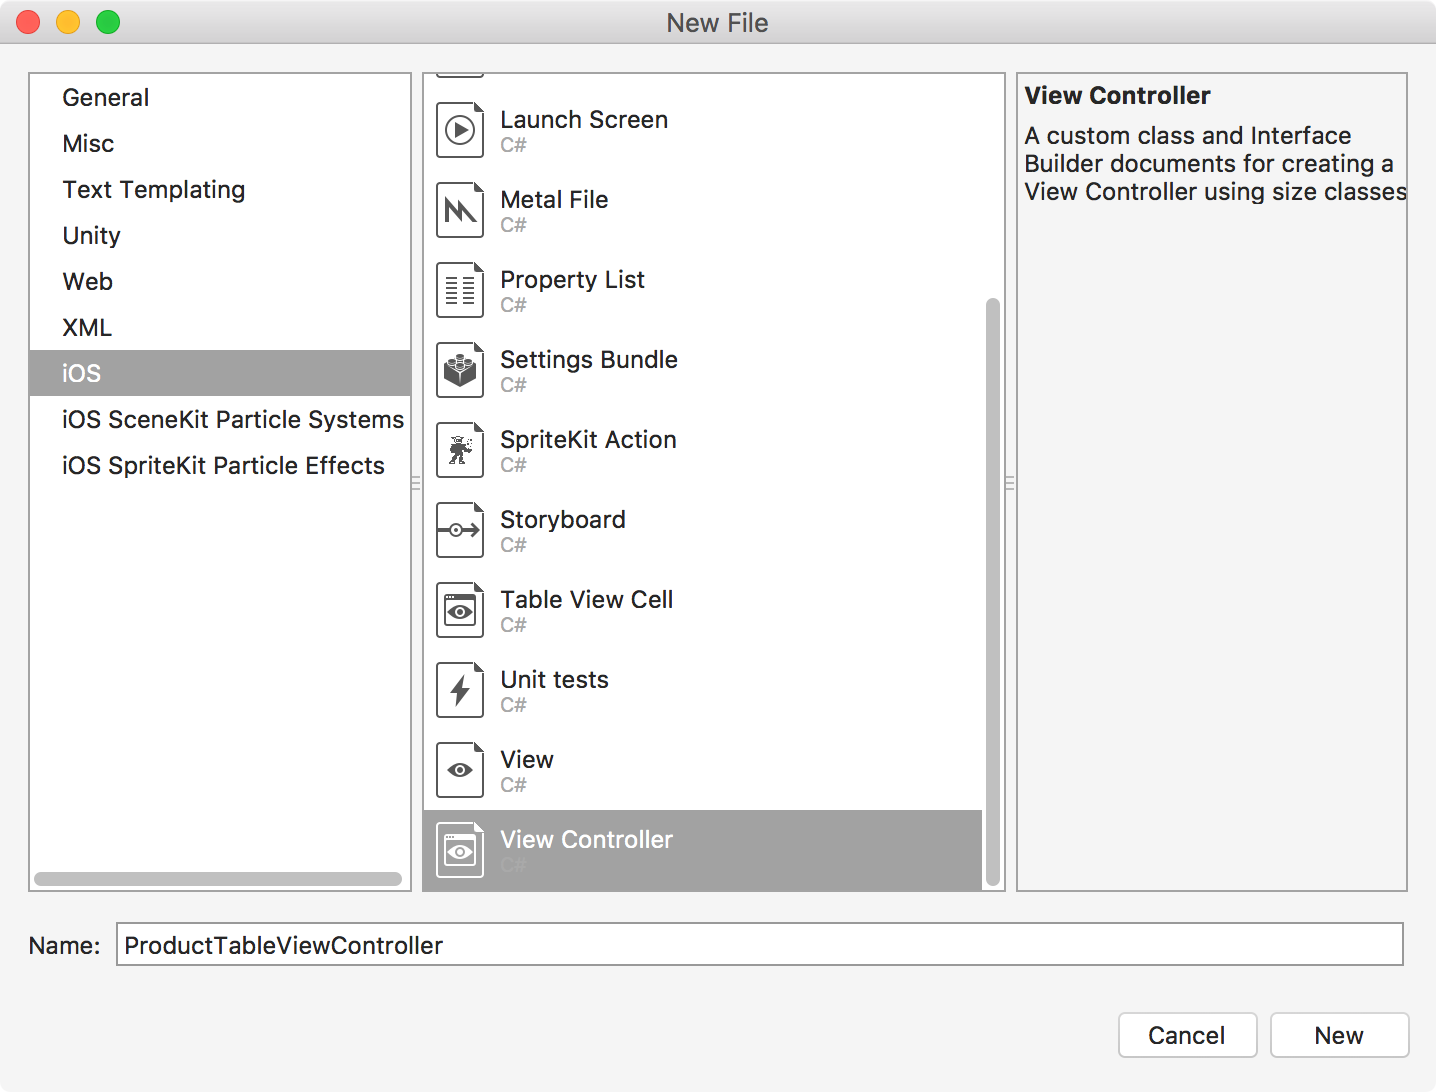
1) Right click the ‘GameStoreXamarin.iOS’ project, Add->New File. Select iOS->View Controller, set name to ‘ProductTableViewController’.
Open the ‘ProductTableViewController.cs’ file, change the base class from ‘UIViewController’ to ‘UITableViewController’.
2) Create another file named ‘ProductTableViewCell.cs’ through Add->New File->iOS->Table View Cell.
3) Create third file named ‘ProductDetailsViewController.cs’ through Add->New File->iOS->View Controller.
4) We will not use the xib files, you can just delete them.
3.2 UI Design with Xcode
Right click on ‘Main.storyboard’, Open With -> Xcode Interface Builder. Notice that all the files from ‘GameStoreXamarin.iOS’ project are showing in Xcode, including the files we just created in Visual Studio.
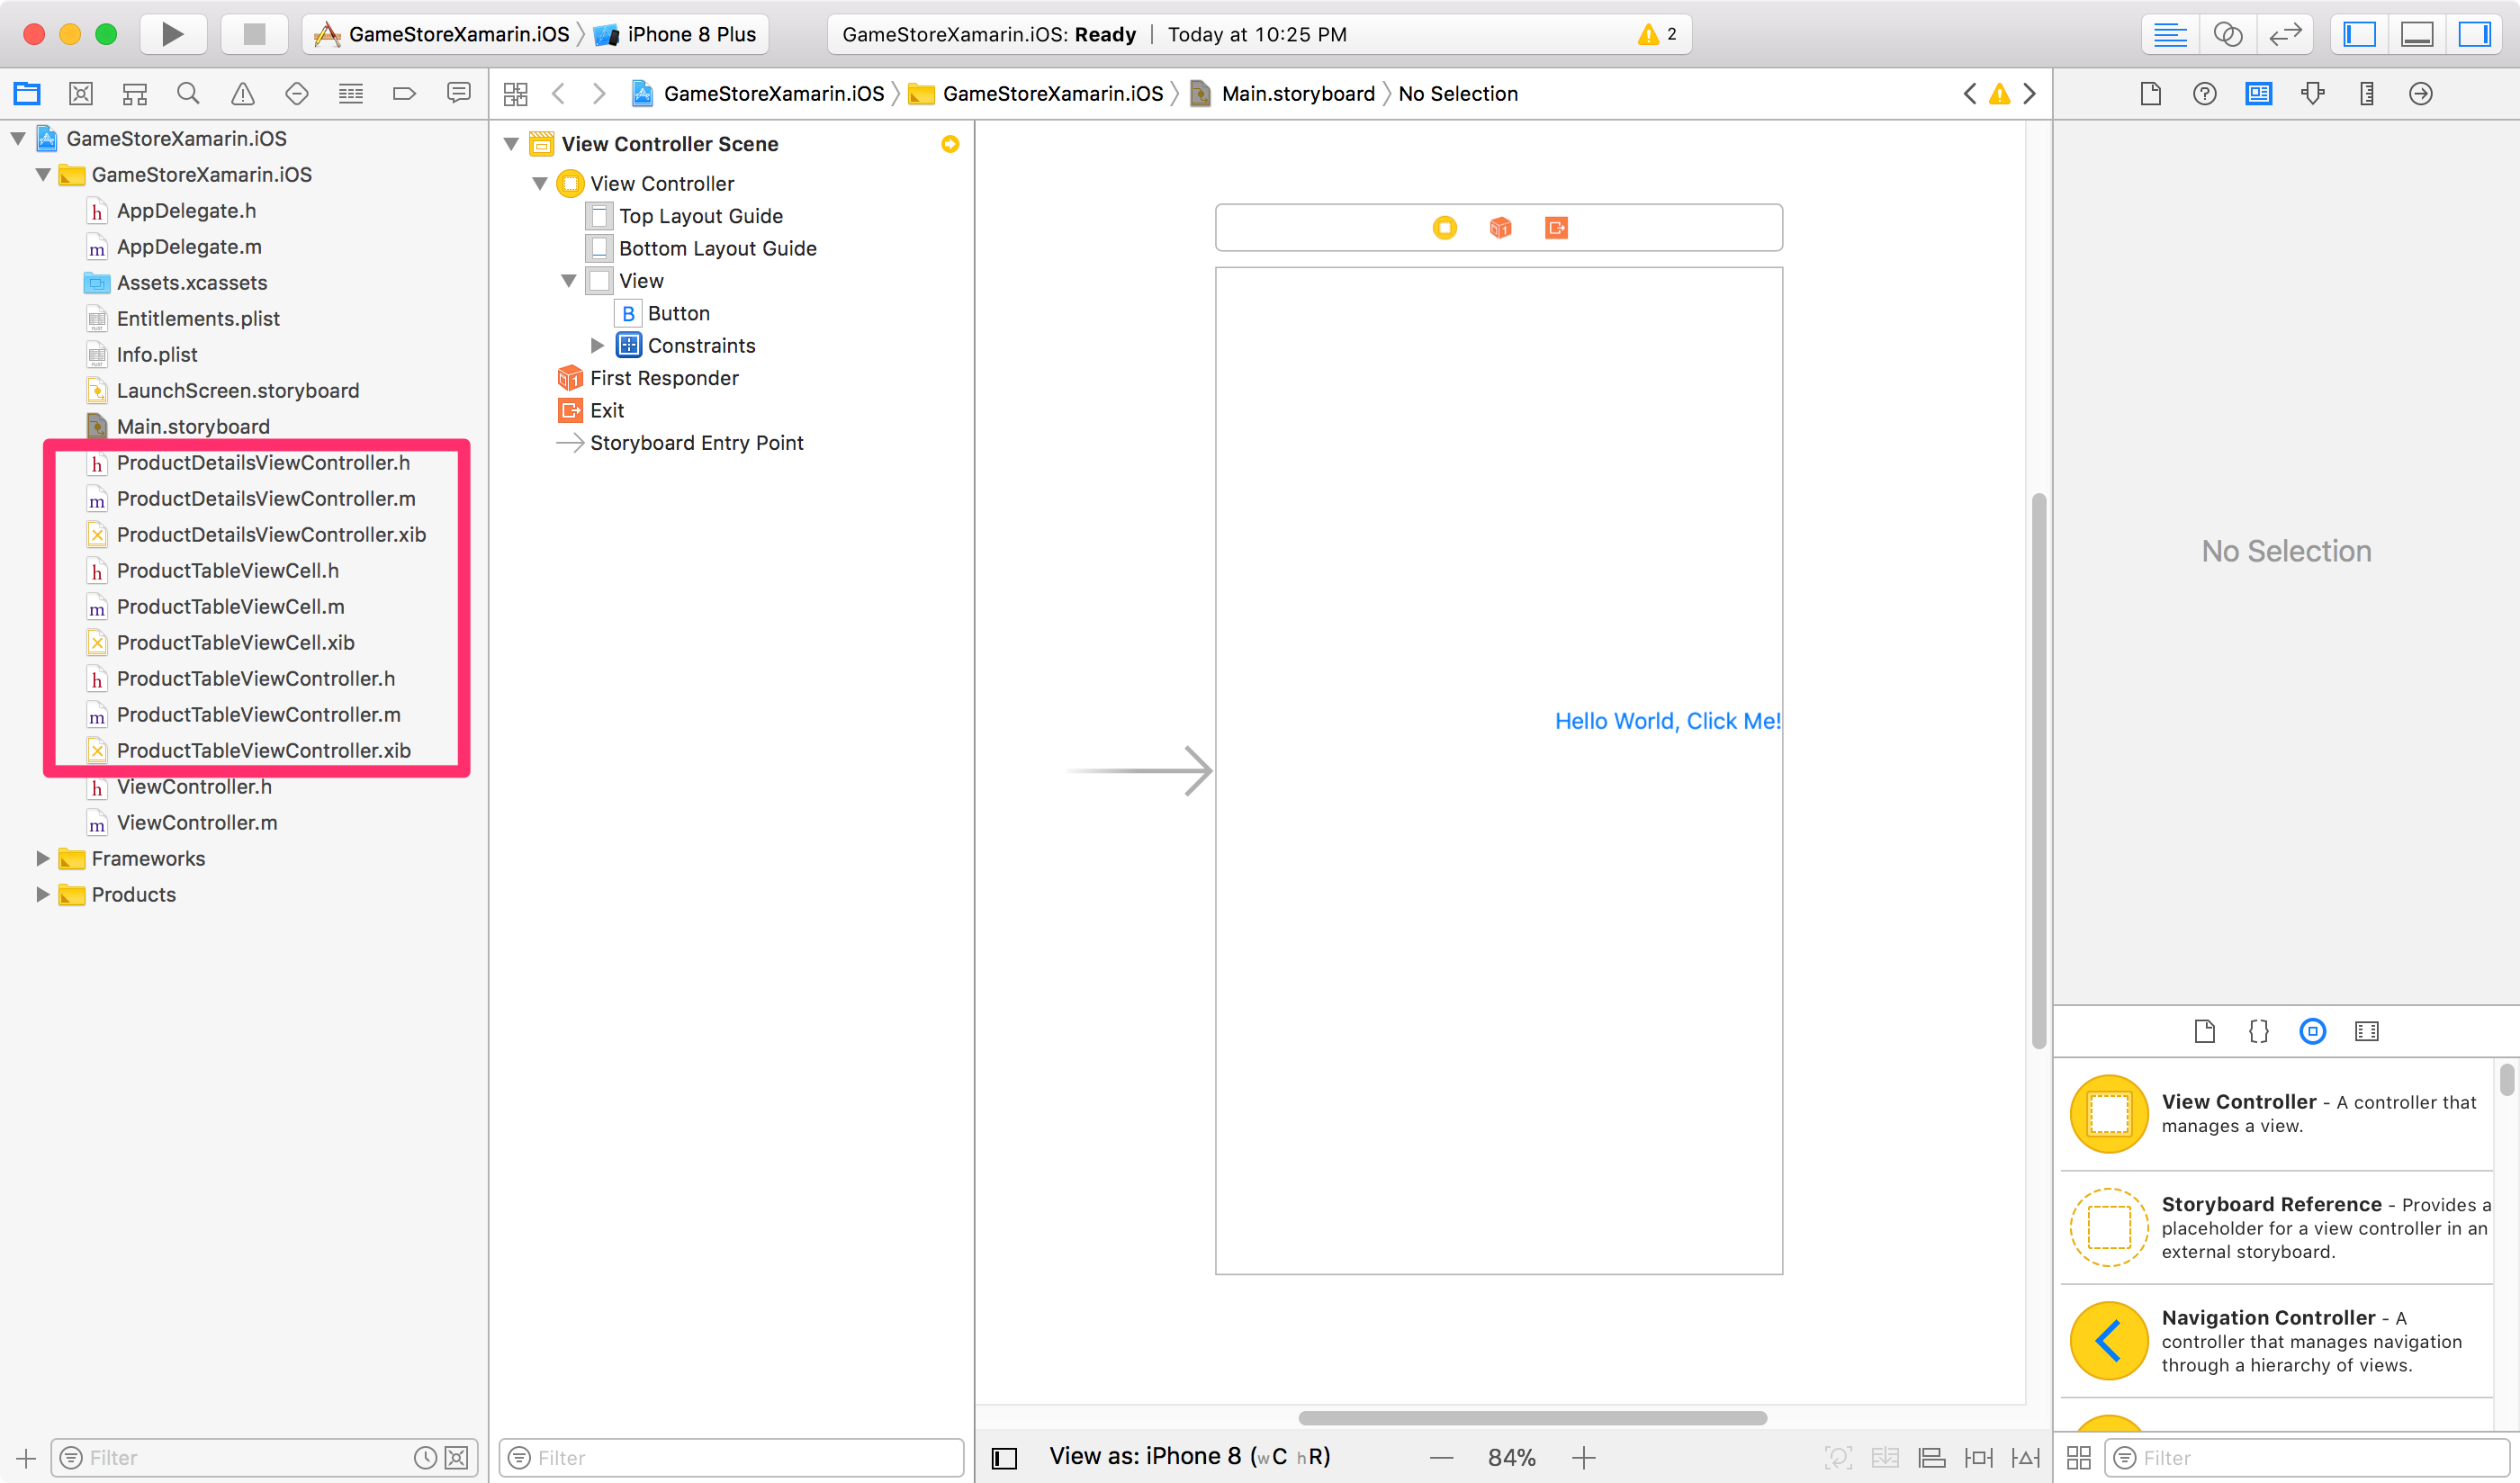
Create two navigation controllers, one table view controller to display product list and one view controller to display product details. And bind view controller classes we created in Visual Studio to these Scenes.
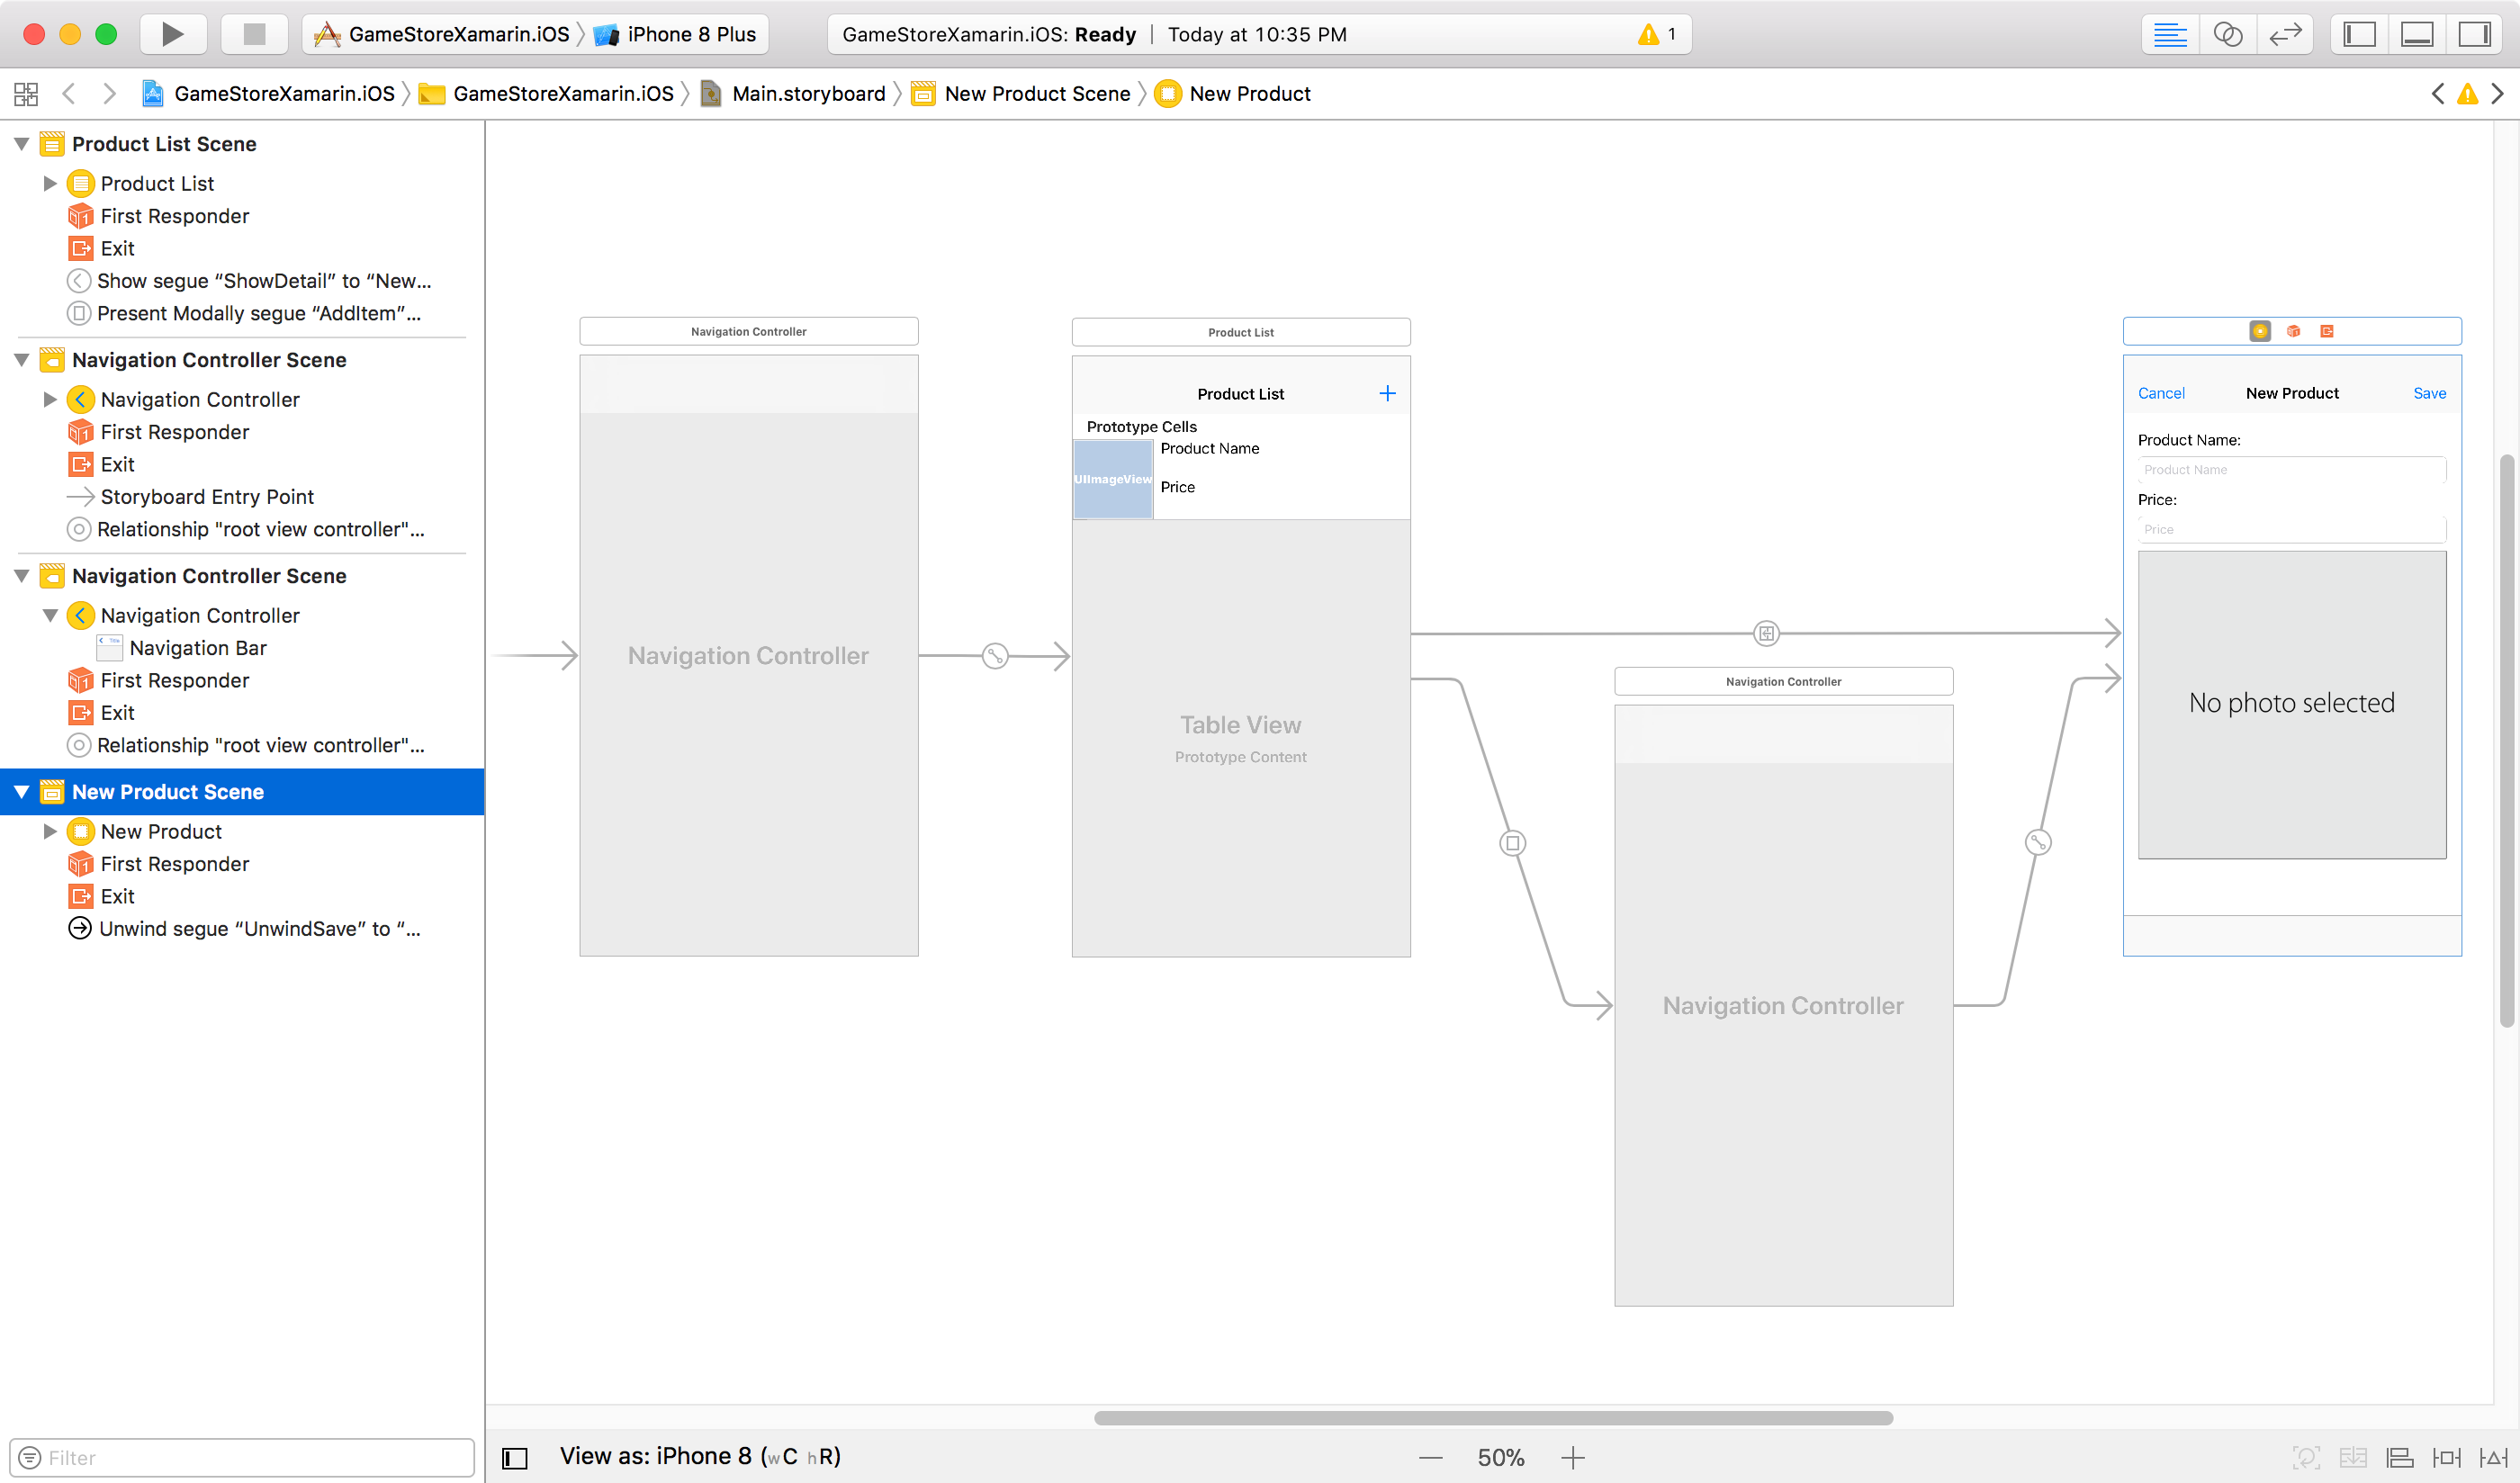
Connect the controls(label, textfield, button, etc) on canvas to code manually.
Save the storyboard before closing it, return to Visual Studio.
3.3 Views in Visual Studio
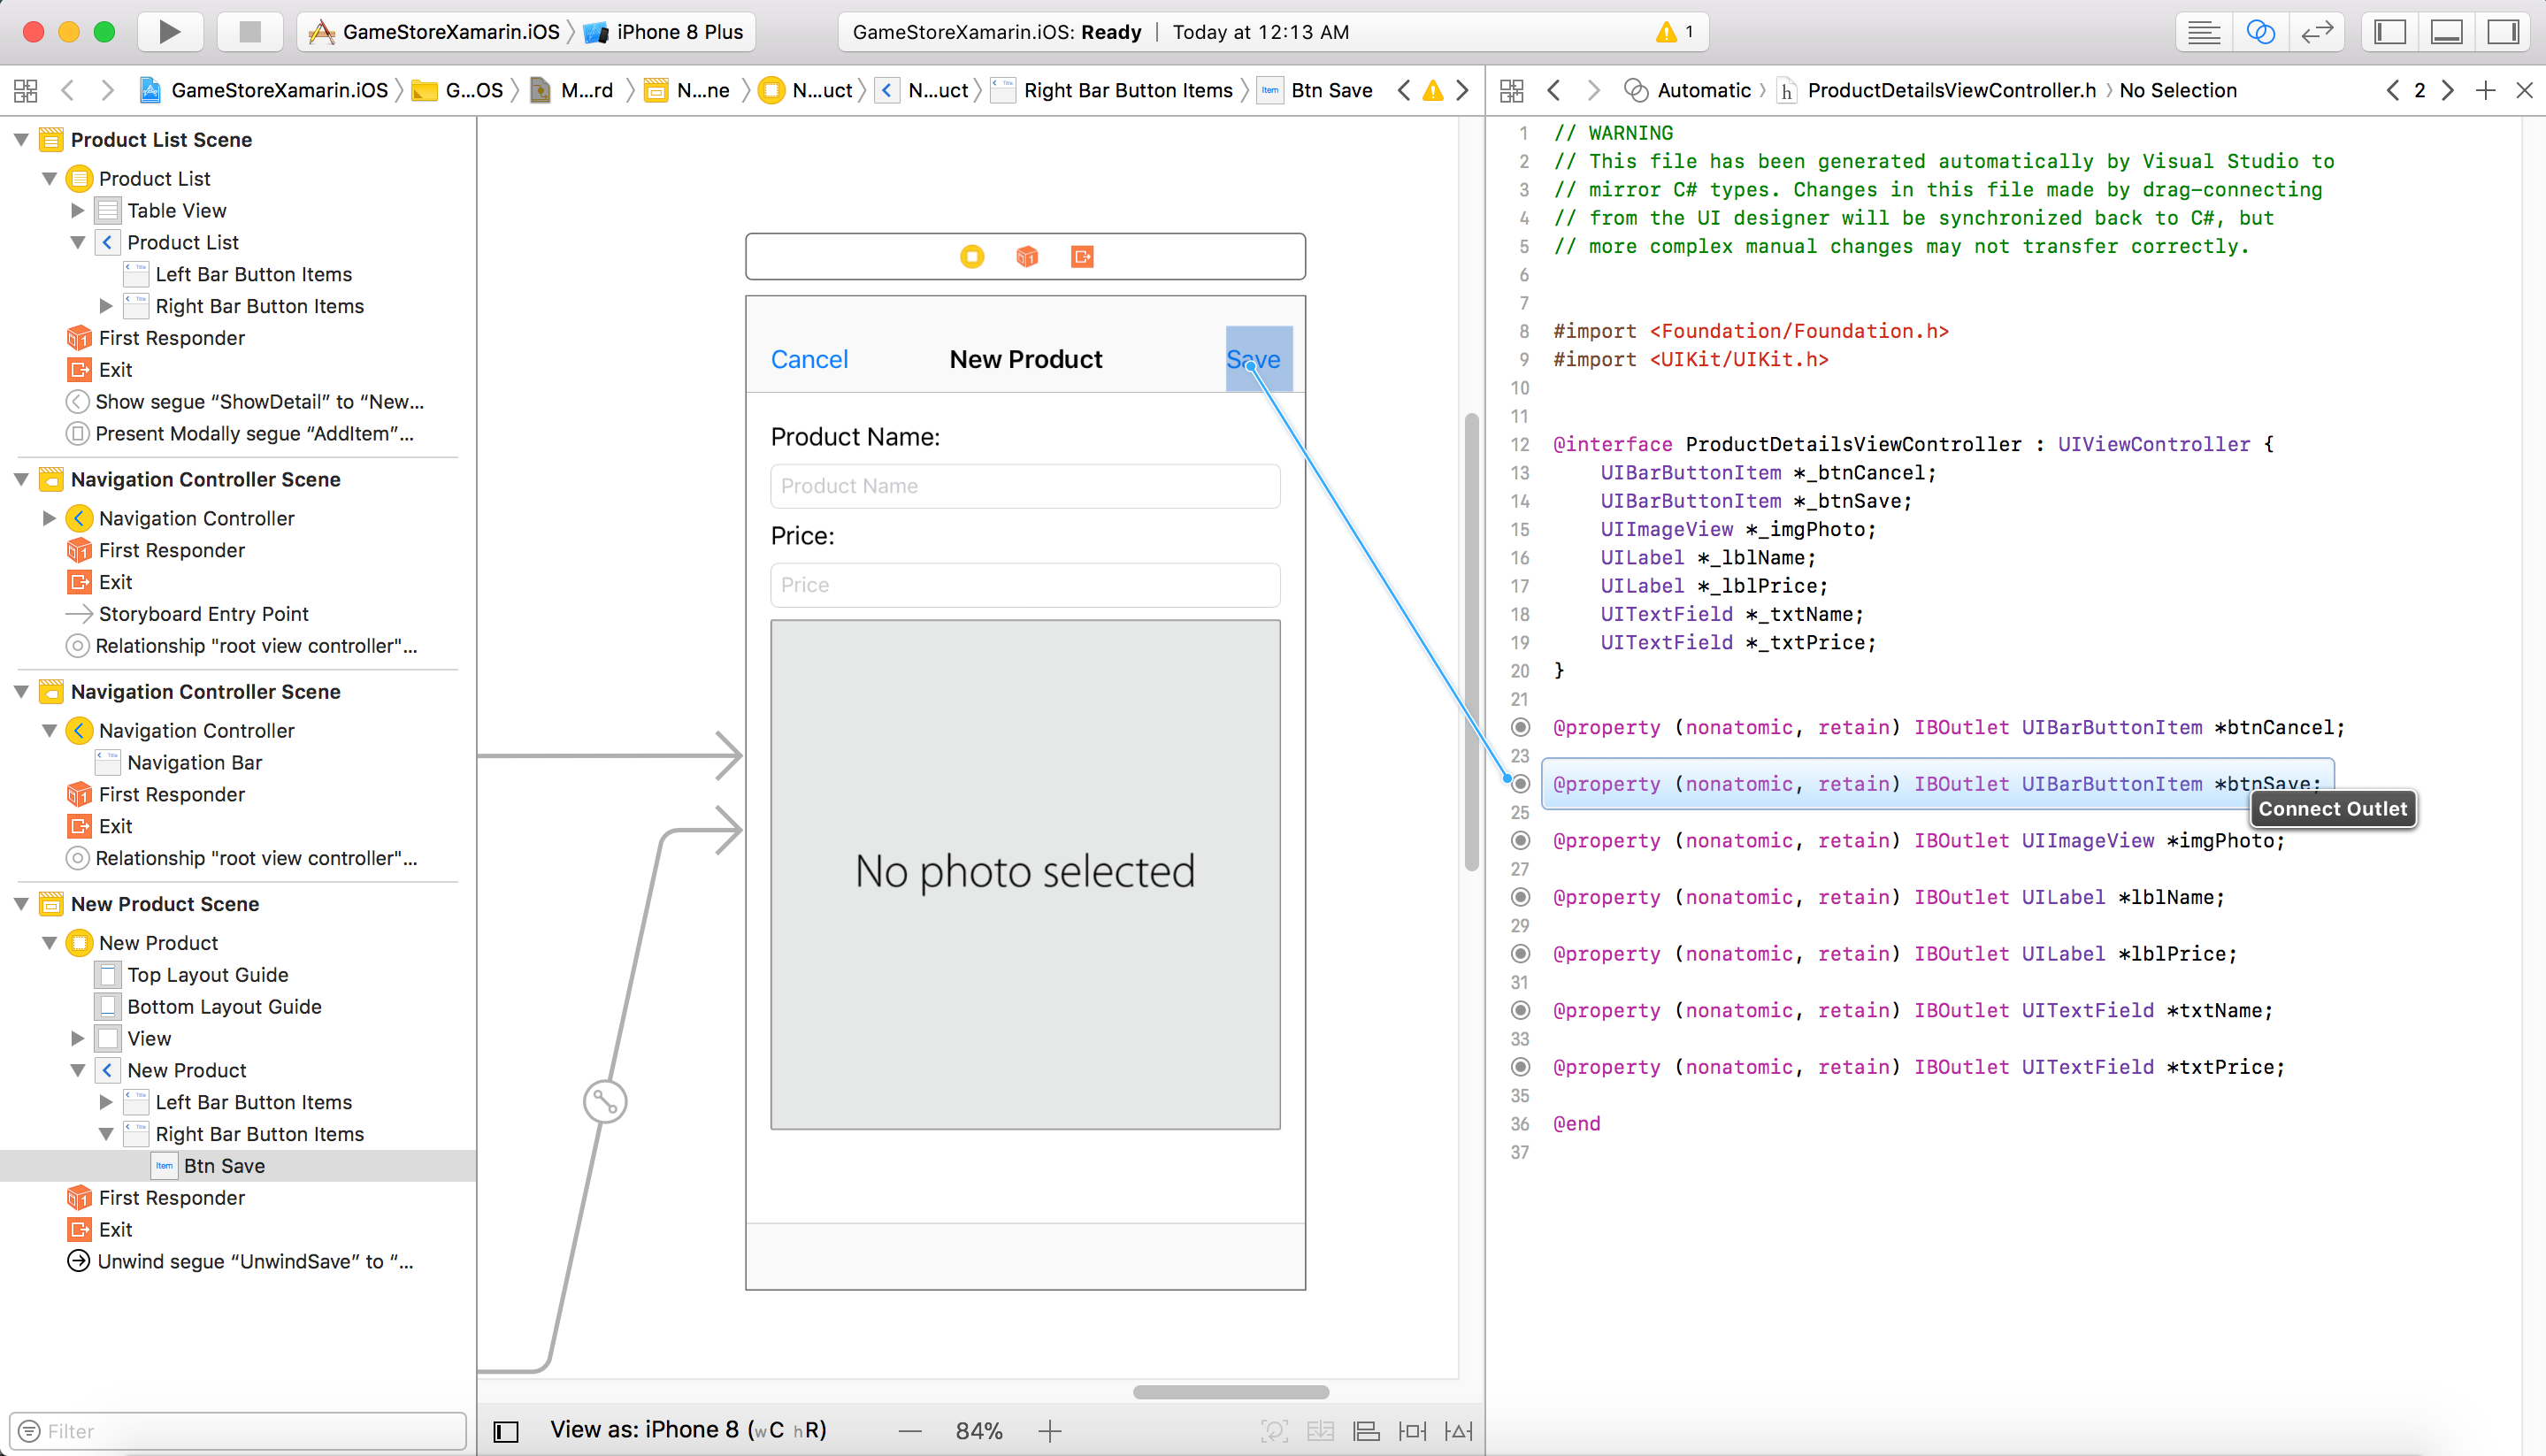
When you add controls(label, textfield, button, etc) to the storyboard in Xcode, some changes will be made to the View Controller classes. For example, in file ‘ProductTableViewCell.designer.cs’, you see two labels and one image view, they all have the Outlet attribute. They are generated automatically by Visual Studio. You should never manually change the content inside a ‘designer.cs’ file.
// WARNING
//
// This file has been generated automatically by Visual Studio from the outlets and
// actions declared in your storyboard file.
// Manual changes to this file will not be maintained.
//
using Foundation;
using System;
using System.CodeDom.Compiler;

namespace GameStoreXamarin.iOS
{
    [Register ("ProductTableViewCell")]
    partial class ProductTableViewCell
    {
        [Outlet]
        UIKit.UILabel lblName { get; set; }
        [Outlet]
        UIKit.UILabel lblPrice { get; set; }
        [Outlet]
        UIKit.UIImageView imgPhoto { get; set; }

        void ReleaseDesignerOutlets ()
        {
        }
    }
}
3.4 Installing Packages
Project->Add NuGet Packages, search and install two packages, ‘sqlite-net-pcl’ and ‘Xamarin.Forms’. Finally, the package.config looks like below.
<?xml version="1.0" encoding="utf-8"?>
<packages>
  <package id="sqlite-net-pcl" version="1.4.118" targetFramework="xamarinios10" />
  <package id="SQLitePCLRaw.bundle_green" version="1.1.9" targetFramework="xamarinios10" />
  <package id="SQLitePCLRaw.core" version="1.1.9" targetFramework="xamarinios10" />
  <package id="SQLitePCLRaw.provider.sqlite3.ios_unified" version="1.1.9" targetFramework="xamarinios10" />
  <package id="Xamarin.Forms" version="2.5.0.91635" targetFramework="xamarinios10" />
</packages>
3.5 Location of Database File
Create a file named ‘FileHelper.cs’. Class FileHelper inherits the IFileHelper interface. Register implementation to DependencyService with a metadata attribute ‘[assembly: Dependency(xxx)]’.
using System;
using System.IO;
using Xamarin.Forms;
using GameStoreXamarin.Core;

[assembly: Dependency(typeof(GameStoreXamarin.iOS.FileHelper))]
namespace GameStoreXamarin.iOS
{
    public class FileHelper : IFileHelper
    {
        public string GetLocalFilePath(string filename)
        {
            string docFolder = Environment.GetFolderPath(Environment.SpecialFolder.Personal);
            string libFolder = Path.Combine(docFolder, "..", "Library", "Databases");

            if (!Directory.Exists(libFolder))
            {
                Directory.CreateDirectory(libFolder);
            }

            return Path.Combine(libFolder, filename);
        }
    }
}
3.6 Image Handling
Create a file named ‘ImageHelper.cs’. Define two methods to convert image to byte array and vice versa.
using System;
using Foundation;
using UIKit;

namespace GameStoreXamarin.iOS.Helper
{
    public static class ImageHelper
    {
        /// Convert byte array to UIImage
        public static UIImage BytesToUIImage(byte[] imageBytes)
        {
            var data = NSData.FromArray(imageBytes);
            return UIImage.LoadFromData(data);
        }

        /// Convert UIImage to byte array
        public static byte[] UIImageToBytes(UIImage image)
        {
            byte[] imageBytes;
            using (NSData imageData = image.AsPNG())
            {
                imageBytes = new Byte[imageData.Length];
                System.Runtime.InteropServices.Marshal.Copy(imageData.Bytes, imageBytes, 0, Convert.ToInt32(imageData.Length));
            }

            return imageBytes;
        }
    }
}
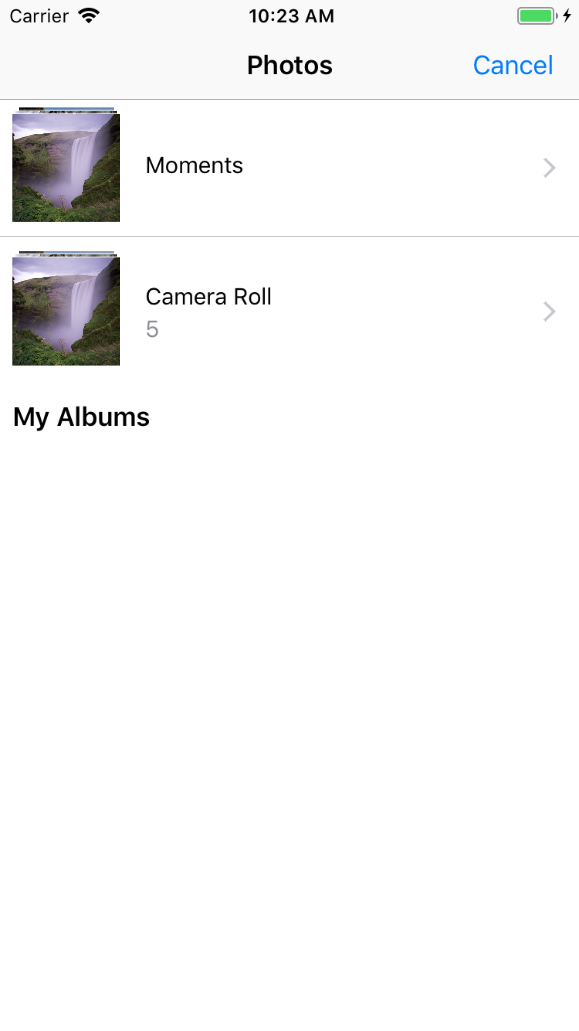
3.7 Loading Photo from Gallery
In the detail view, we need to enable user to select photos from gallery when he/she taps the image control(named ‘imgPhoto’). In ‘ProductDetailsViewController.cs’, add GestureRecognizer for ‘imgPhoto’ control.
// Tap gesture
imgPhoto.UserInteractionEnabled = true;
imgPhoto.AddGestureRecognizer(new UITapGestureRecognizer(tap =>
{
    txtName.ResignFirstResponder();
    txtPrice.ResignFirstResponder();

    // UIImagePickerController is a view controller that lets a user pick media from their photo library.
    _imagePicker = new UIImagePickerController();

    // Only allow photos to be picked, not taken.
    _imagePicker.SourceType = UIImagePickerControllerSourceType.PhotoLibrary;
    _imagePicker.MediaTypes = UIImagePickerController.AvailableMediaTypes(UIImagePickerControllerSourceType.PhotoLibrary);

    // Events
    _imagePicker.FinishedPickingMedia += Handle_FinishedPickingMedia;
    _imagePicker.Canceled += Handle_Canceled;

    // Show Image Picker
    NavigationController.PresentModalViewController(_imagePicker, true);
})
{
    NumberOfTapsRequired = 1 // Signle tap
});
Add event to handle the scenario when user selects one image, that is, load the image to image view control.
protected void Handle_FinishedPickingMedia(object sender, UIImagePickerMediaPickedEventArgs e)
{
    // determine what was selected, video or image
    bool isImage = false;
    switch (e.Info[UIImagePickerController.MediaType].ToString())
    {
        case "public.image":
            isImage = true;
            break;
        case "public.video":
            break;
    }

    if (isImage)
    {
        UIImage originalImage = e.Info[UIImagePickerController.OriginalImage] as UIImage;
        if (originalImage != null)
        {
            imgPhoto.Image = originalImage;
            _imageChanged = true;
        }
    }
    // dismiss the picker
    _imagePicker.DismissModalViewController(true);
}
Add another event to handle the scenario that user clicks Cancel button, that is, do nothing but dismiss the image picker control.
protected void Handle_Canceled(object sender, EventArgs e)
{
    _imagePicker.DismissModalViewController(true);
}
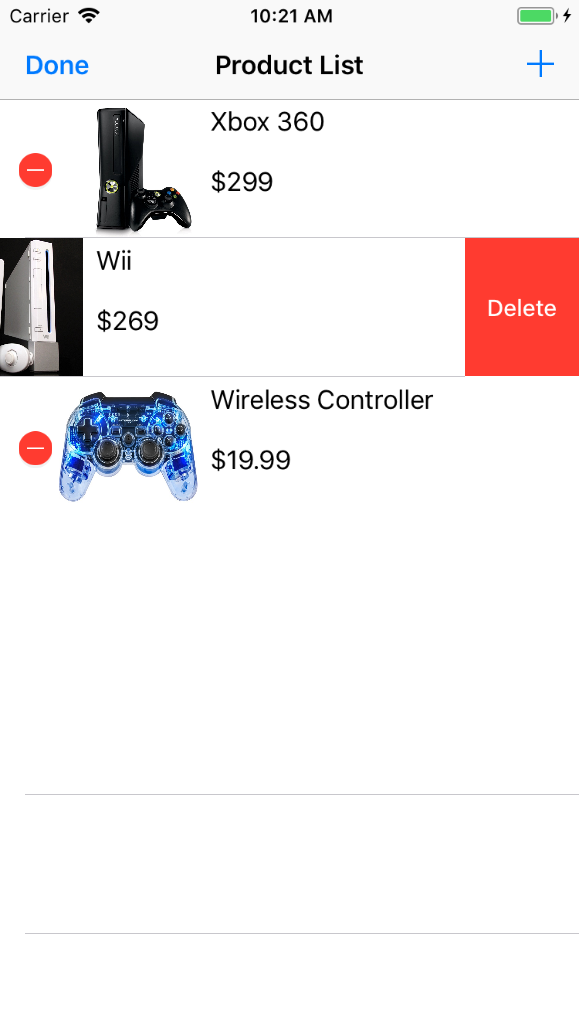
3.8 Adding Images
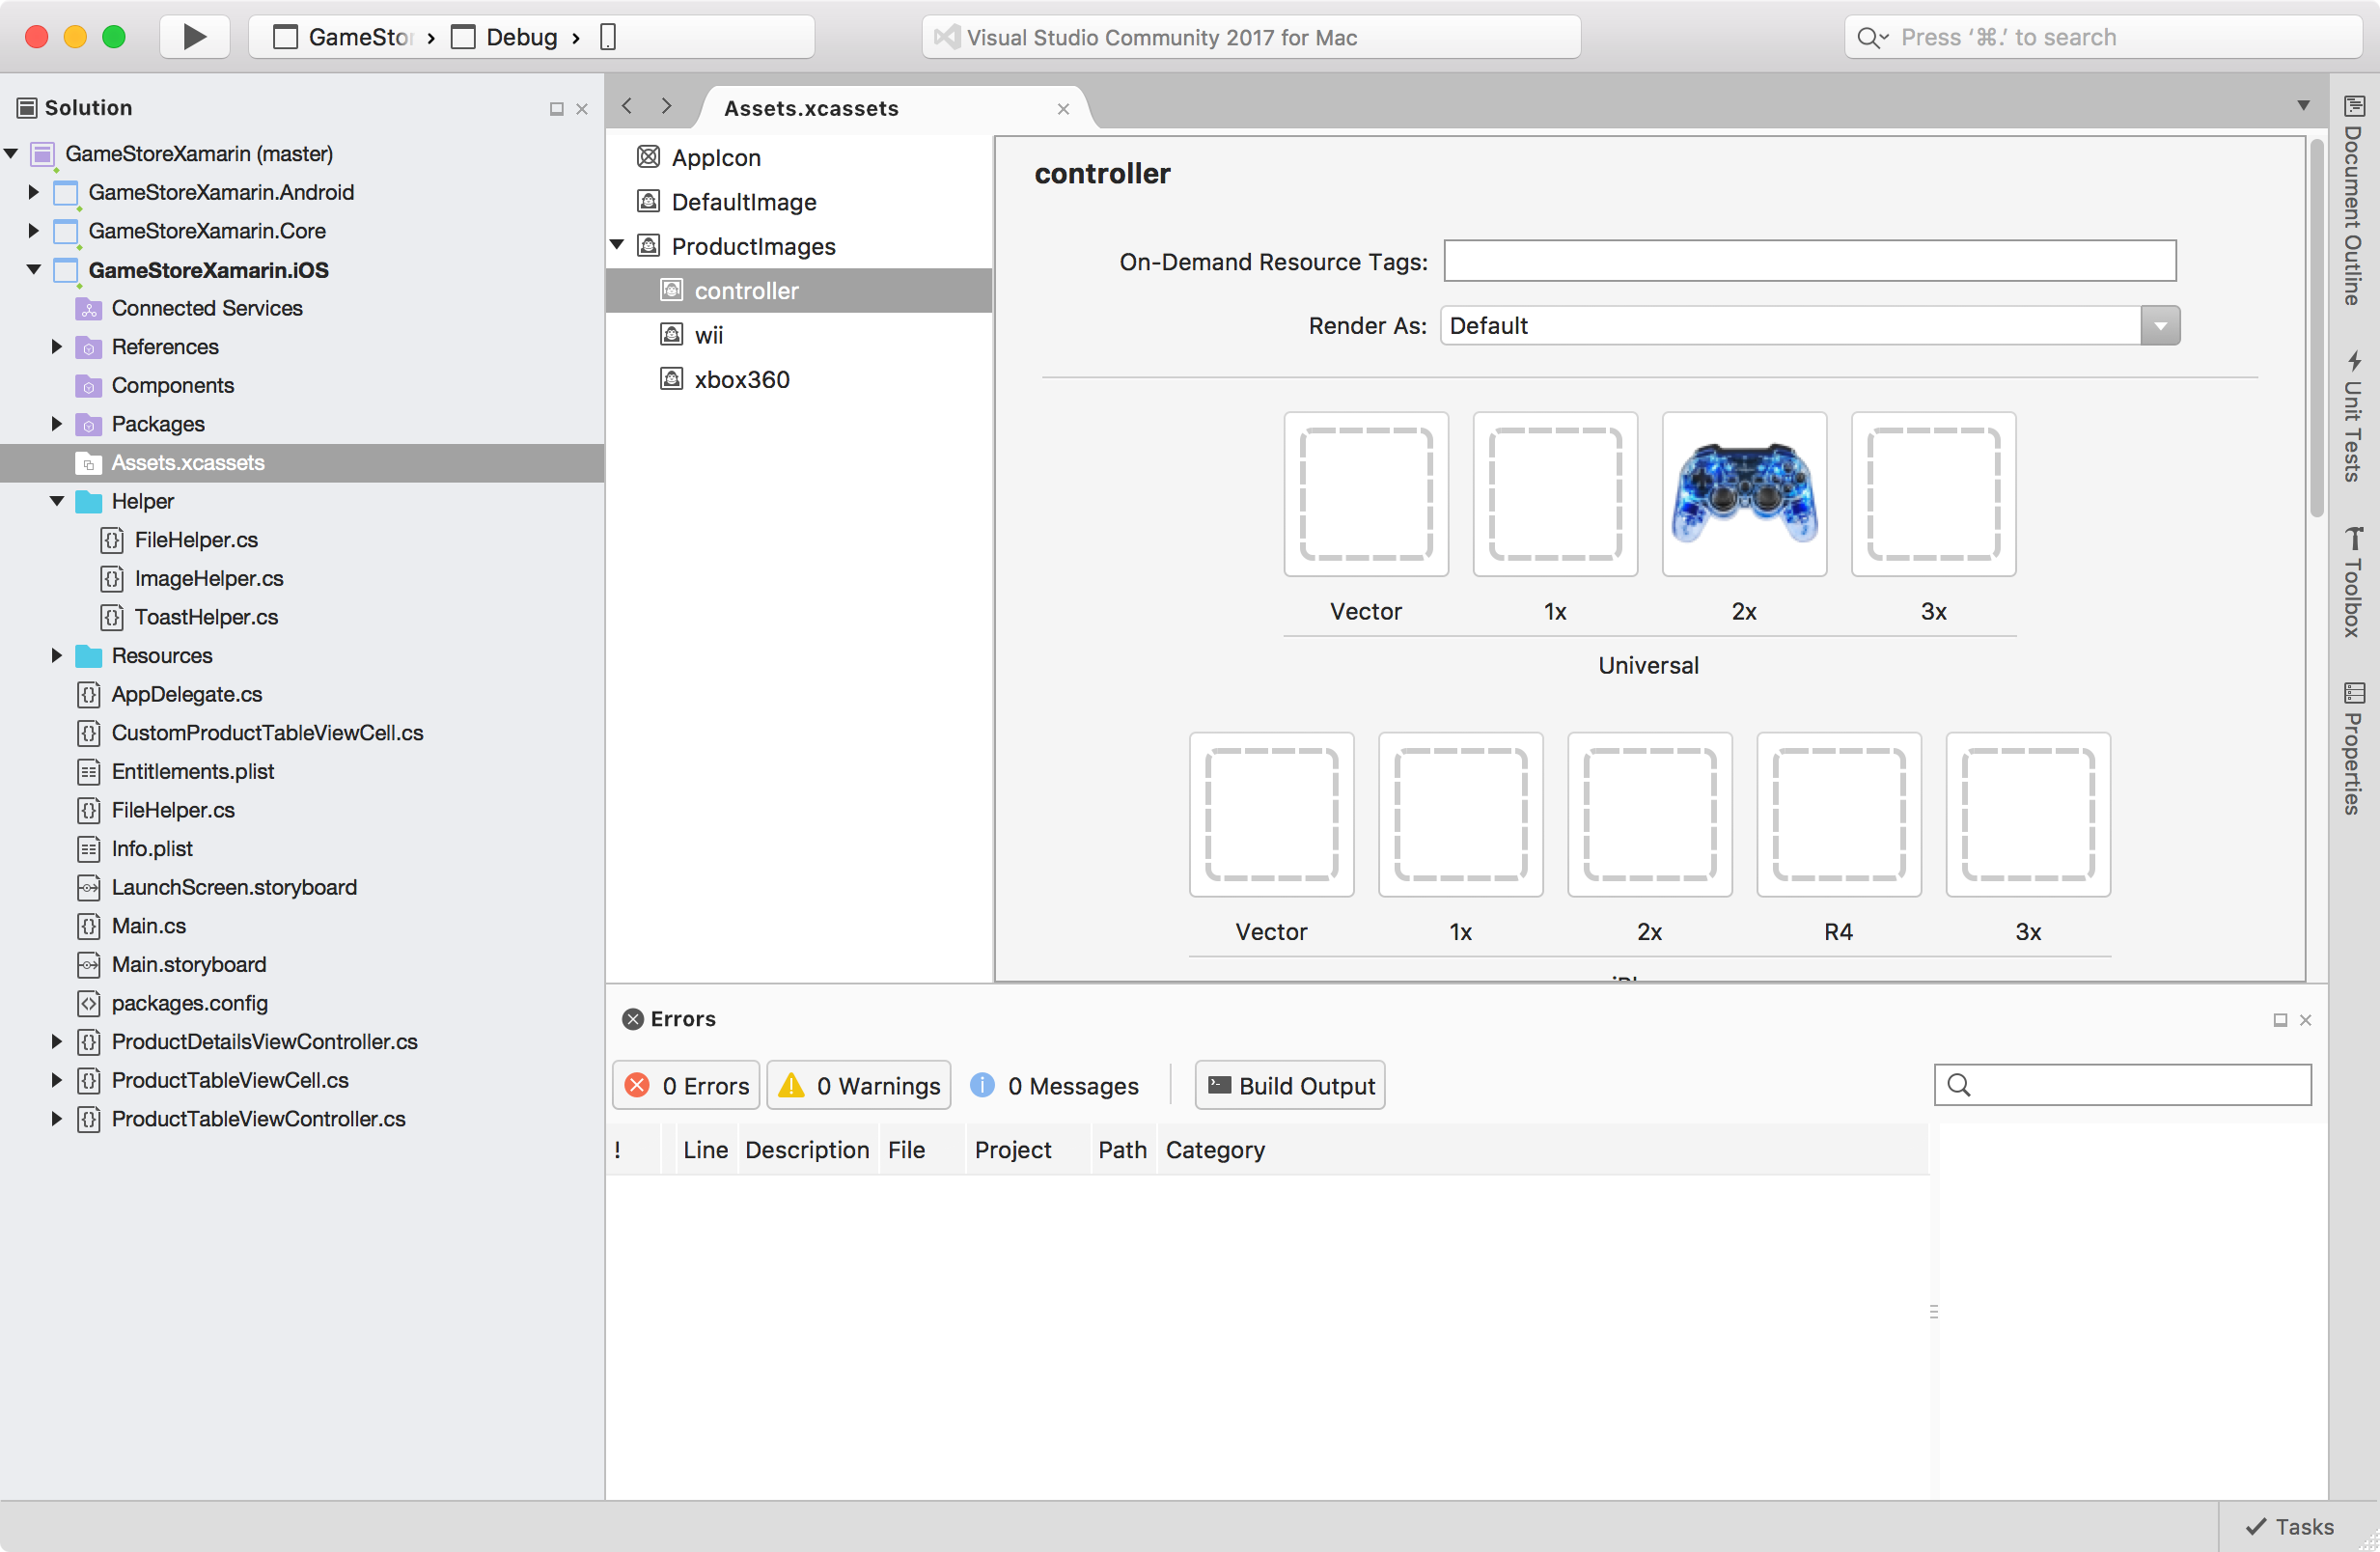
Add three images to assets.xcassets. These images are used as product’s photo.
3.9 Dummy Data
Create three products with images in assets. If there is no data in SQLite database, call this method get initial products.
private void CreateDummyData()
{
Product product = new Product();
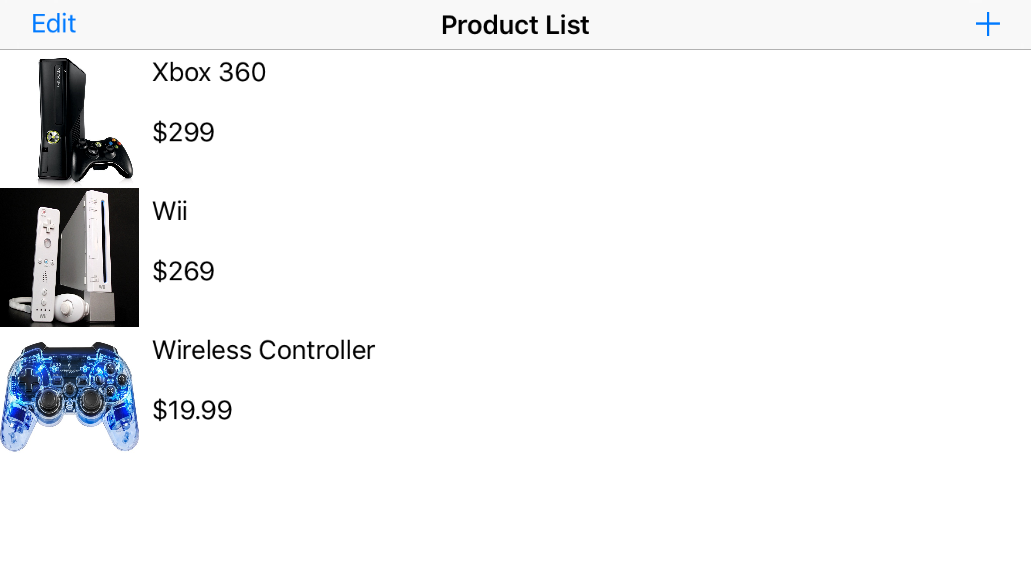
product.ProductName = "Xbox 360";
product.Price = 299.00;
product.Image = ImageHelper.UIImageToBytes(UIImage.FromBundle("xbox360"));
DatabaseHelper.Database.SaveProduct(product);
product = new Product();
product.ProductName = "Wii";
product.Price = 269.00;
product.Image = ImageHelper.UIImageToBytes(UIImage.FromBundle("wii"));
DatabaseHelper.Database.SaveProduct(product);
product = new Product();
product.ProductName = "Wireless Controller";
product.Price = 19.99;
product.Image = ImageHelper.UIImageToBytes(UIImage.FromBundle("controller"));
DatabaseHelper.Database.SaveProduct(product);
_productList = DatabaseHelper.Database.GetProducts();
}
3.10 Customizing Table Cell
In the list view, we can customize the display style for each row. You can set the position, font, color, etc.
using System;
using CoreGraphics;
using Foundation;
using UIKit;

namespace GameStoreXamarin.iOS
{
    public class CustomProductTableViewCell : UITableViewCell
    {
        UILabel headingLabel, subheadingLabel;
        UIImageView imageView;
        public CustomProductTableViewCell(NSString cellId) : base(UITableViewCellStyle.Default, cellId)
        {
            SelectionStyle = UITableViewCellSelectionStyle.Gray;
            //ContentView.BackgroundColor = UIColor.FromRGB(218, 255, 127);
            imageView = new UIImageView();
            headingLabel = new UILabel()
            {
                //Font = UIFont.FromName("Cochin-BoldItalic", 22f),
                //TextColor = UIColor.FromRGB(127, 51, 0),
                BackgroundColor = UIColor.Clear
            };
            subheadingLabel = new UILabel()
            {
                //Font = UIFont.FromName("AmericanTypewriter", 12f),
                //TextColor = UIColor.FromRGB(38, 127, 0),
                //TextAlignment = UITextAlignment.Center,
                BackgroundColor = UIColor.Clear
            };
            ContentView.AddSubviews(new UIView[] { headingLabel, subheadingLabel, imageView });

        }
        public void UpdateCell(string name, string price, UIImage image)
        {
            imageView.Image = image;
            headingLabel.Text = name;
            subheadingLabel.Text = "$" + price;
        }
        public override void LayoutSubviews()
        {
            base.LayoutSubviews();
            imageView.Frame = new CGRect(0.0, 0.0, 90, 90);
            headingLabel.Frame = new CGRect(98, 4, 268, 21);
            subheadingLabel.Frame = new CGRect(98, 43, 268, 21);
        }
    }
}
3.11 List View
When app is started, products should be displayed in the list view. Call the Database method defined in Core project to get data from SQLite. If there is no data, create three products locally.
public override void ViewDidLoad()
{
    base.ViewDidLoad();
    Xamarin.Forms.Forms.Init();

    NavigationItem.LeftBarButtonItem = EditButtonItem;

    _productList = DatabaseHelper.Database.GetProducts();
    if (_productList == null || _productList.Count == 0) {
        CreateDummyData();
    }
}
Override the NumberOfSections,RowsInSection,GetCell methods of UITableViewController to display the data from ‘_productList’.
public override nint NumberOfSections(UITableView tableView) {
    return 1;
}

public override nint RowsInSection(UITableView tableView, nint section)
{
    return _productList.Count;
}
public override UITableViewCell GetCell(UITableView tableView, NSIndexPath indexPath) {

    // Table view cells are reused and should be dequeued using a cell identifier.
    var cellIdentifier = "ProductTableViewCell";

    var cell = tableView.DequeueReusableCell(cellIdentifier) as CustomProductTableViewCell;

    if (cell == null)
    {
        cell = new CustomProductTableViewCell(NSString.FromData(cellIdentifier, NSStringEncoding.UTF8));
    }

    // Fetches the appropriate product for the data source layout.
    var product = _productList[indexPath.Row];
    cell.UpdateCell(product.ProductName, Convert.ToString(product.Price), ImageHelper.BytesToUIImage(product.Image));

    return cell;
}
3.11 Navigation from List View to Detail View
First, you need to add Segue from table view cell to Navigation controller in storyboard. Then, override RowSelected and PrepareForSegue methods.
public override void RowSelected (UITableView tableView, NSIndexPath indexPath)
{
    this.PerformSegue("ShowDetail", indexPath); // pass indexPath as sender
}

public override void PrepareForSegue(UIStoryboardSegue segue, NSObject sender)
{
    base.PrepareForSegue(segue, sender);

    switch (segue.Identifier)
    {
        case "AddItem":
            break;
        case "ShowDetail":
            var pdvc = segue.DestinationViewController as ProductDetailsViewController;
            if (pdvc != null) {
                var indexPath = sender as NSIndexPath;
                if (indexPath != null)
                {
                    var selectedProduct = _productList[indexPath.Row];
                    pdvc._product = selectedProduct;
                }
            }
            break;
        default:
            break;
    }
}
3.12 Navigation from Detail View to List View
First, define an action method in ‘ProductTableViewController.cs’.
[Action("UnwindToProductTableViewController:")]
public void UnwindToProductTableViewController(UIStoryboardSegue segue)
{
    var sourceViewController = segue.SourceViewController as ProductDetailsViewController;
    if (sourceViewController != null) {
        var product = sourceViewController._product;
        if (product != null) {
            var selectedIndexPath = TableView.IndexPathForSelectedRow;
            if (selectedIndexPath != null)  {
                // Update an existing product.
                _productList[selectedIndexPath.Row] = product;
            }
            else {
                // Add a new product.
                _productList.Add(product);
            }
            TableView.ReloadData();
            DatabaseHelper.Database.SaveProduct(product);
        }
    }
}
Second, unwind segue to Exit for the Cancel button, select the action method defined in list view.
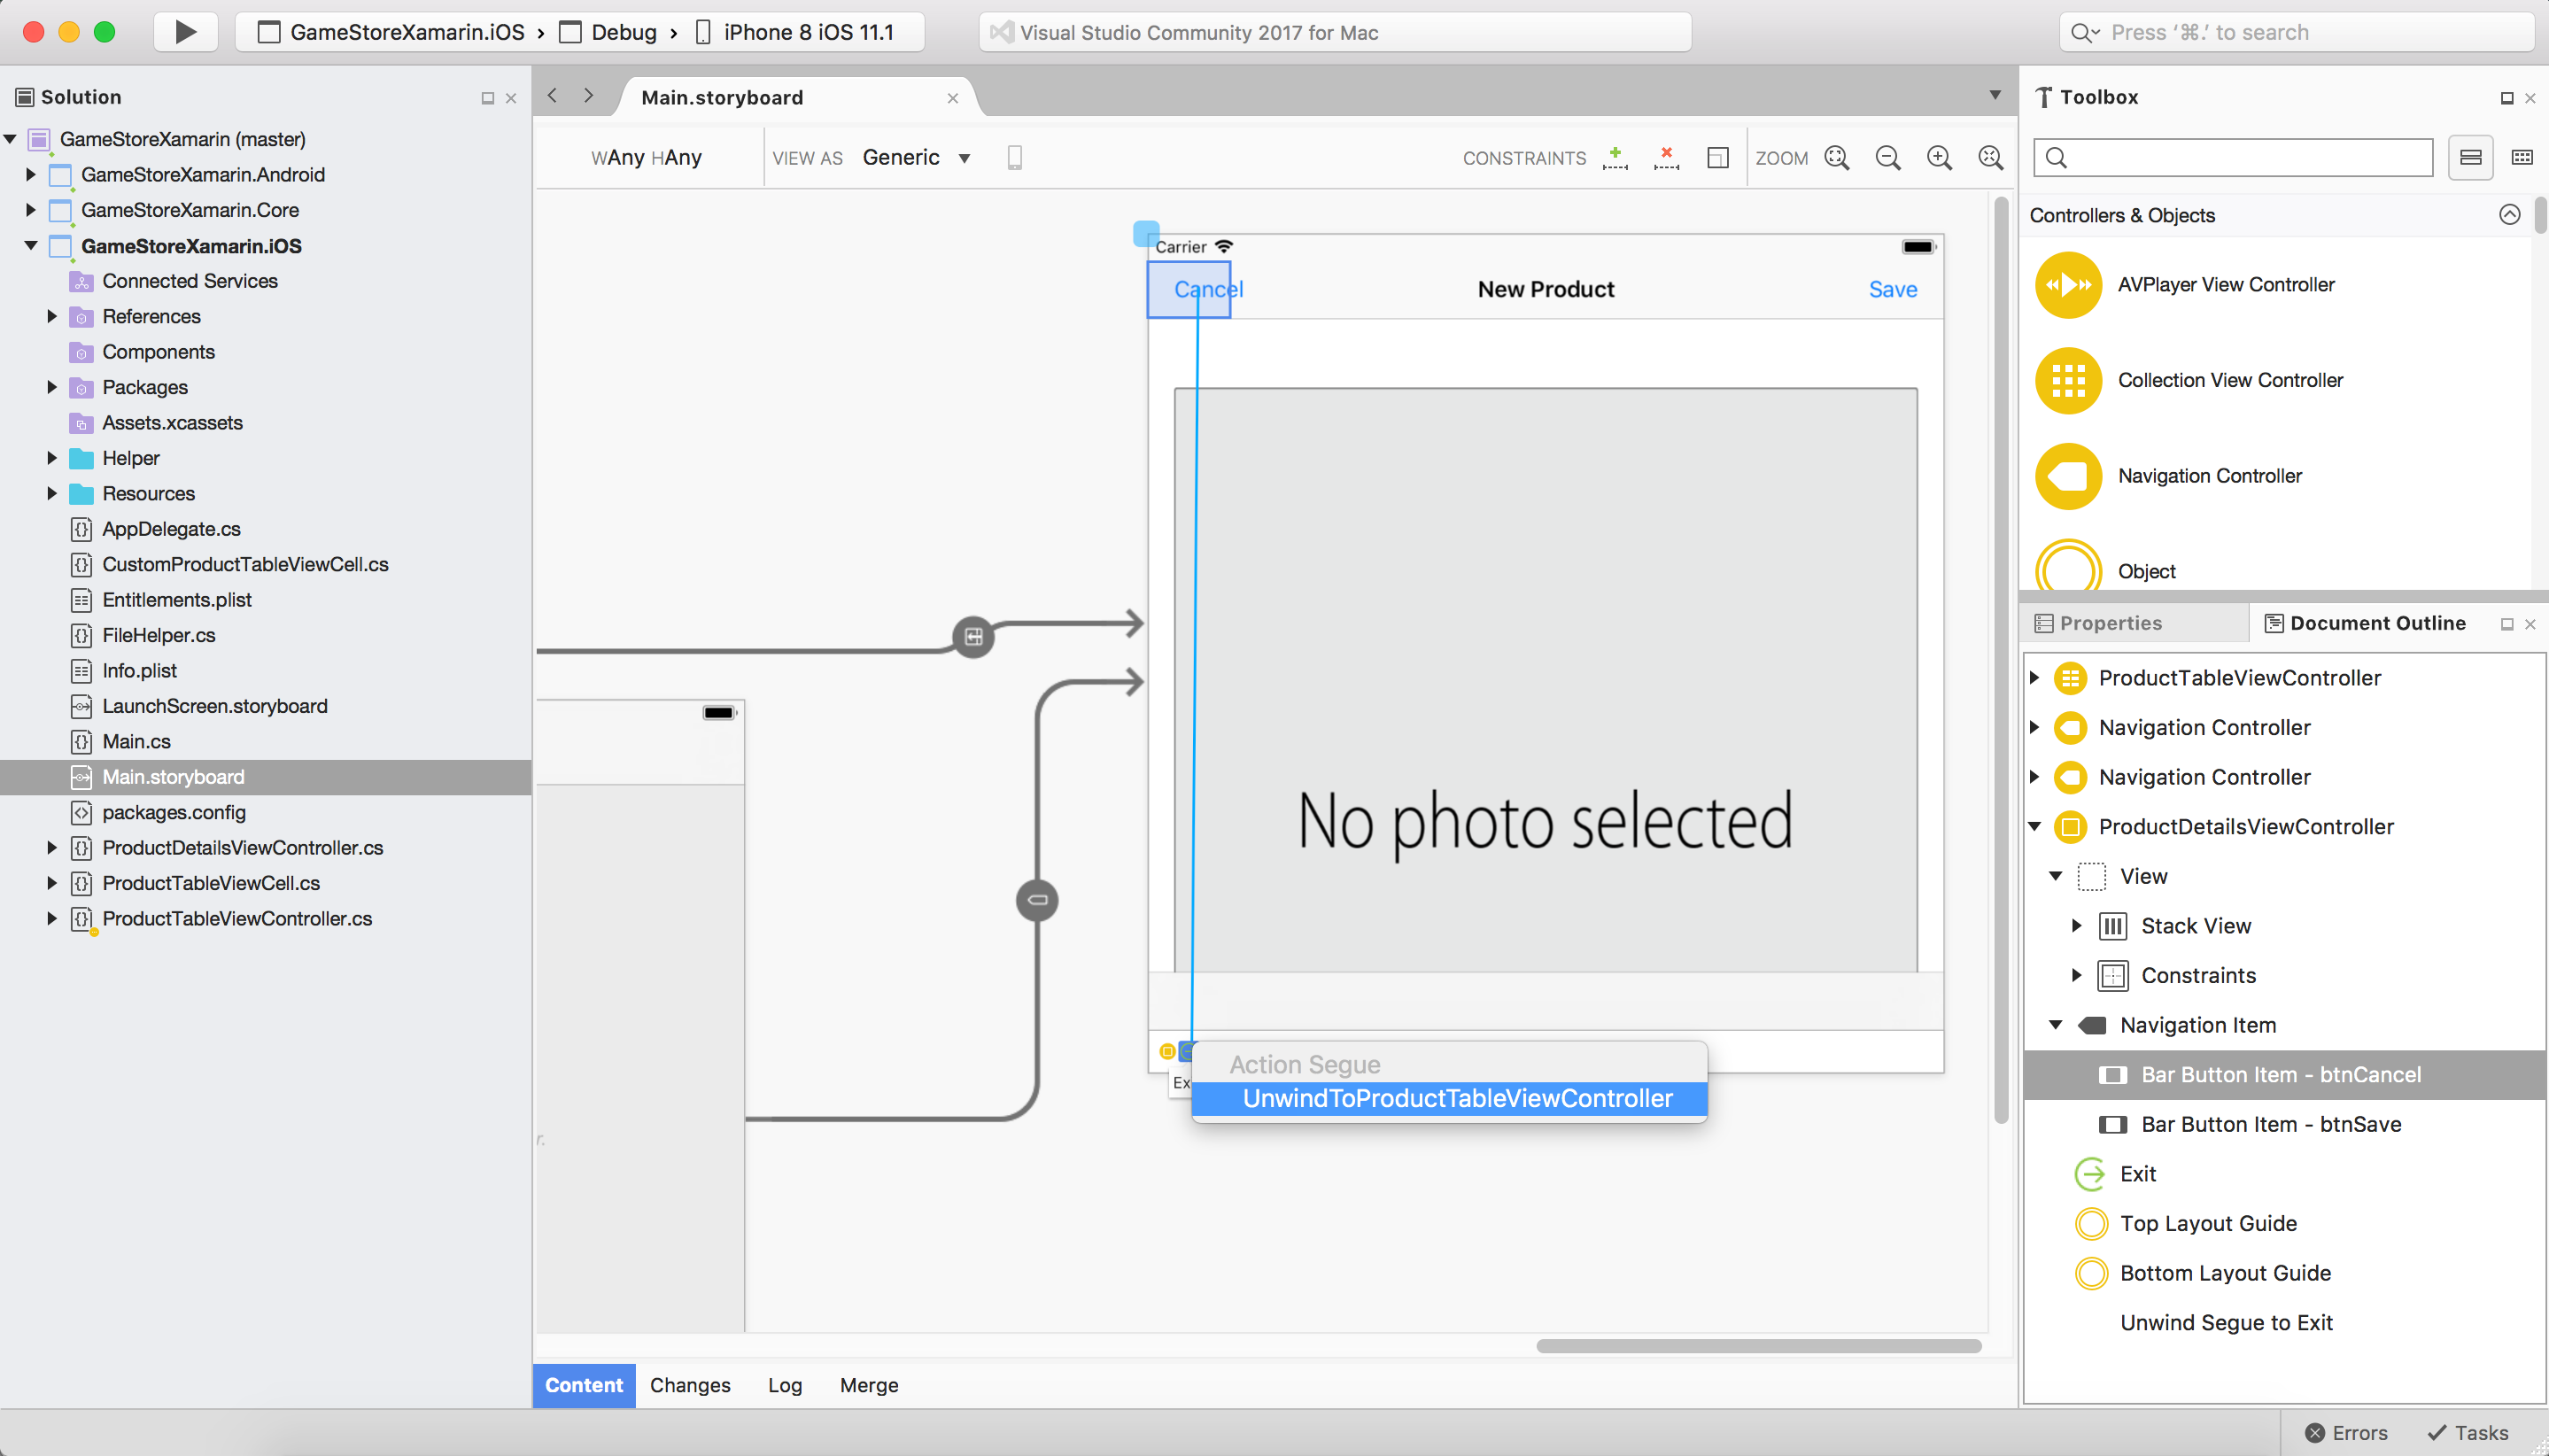
When tapping the Cancel button in the detail view, screen will return to the list view. For the Save button, we need to do more. Override the ‘PrepareForSegue’ method, save the change.
public override void PrepareForSegue(UIStoryboardSegue segue, NSObject sender)
{
    base.PrepareForSegue(segue, sender);

    var button = sender as UIBarButtonItem;
    if (button != null) {
        if (_product == null)
        {
            _product = new Product();
        }
        _product.ProductName = txtName.Text;
        _product.Price = Convert.ToDouble(txtPrice.Text);
        _product.Image = ImageHelper.UIImageToBytes(imgPhoto.Image);
    }
}
Manually perform the Segue in the Save event.
this.PerformSegue("UnwindSave", btnSave);
3.12 Final Project Structure
The final structure of the iOS project.
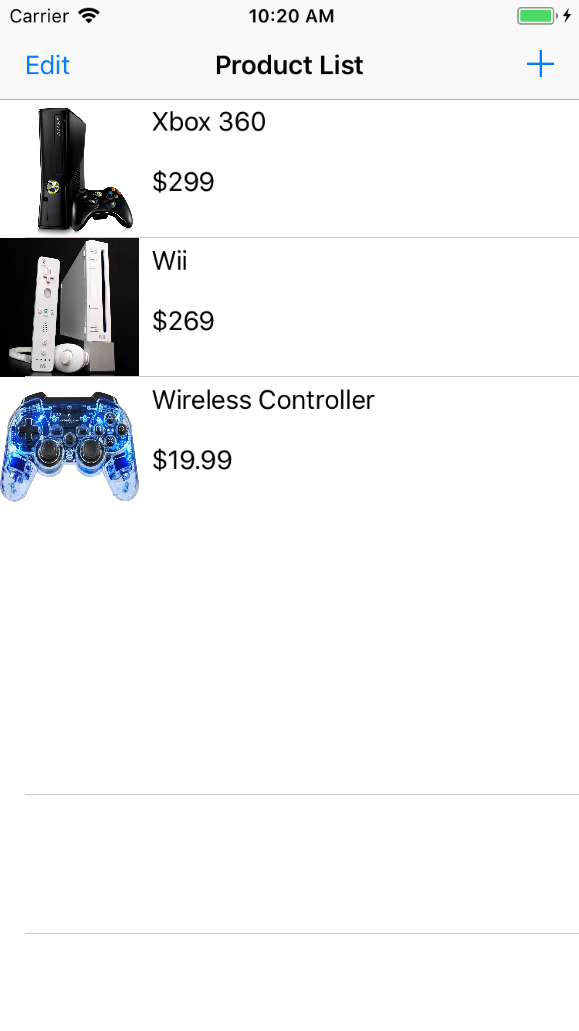
4. Testing
In Visual Studio, click the arrow button(or Run->Start Without Debugging) to run the app in iOS Simulator.
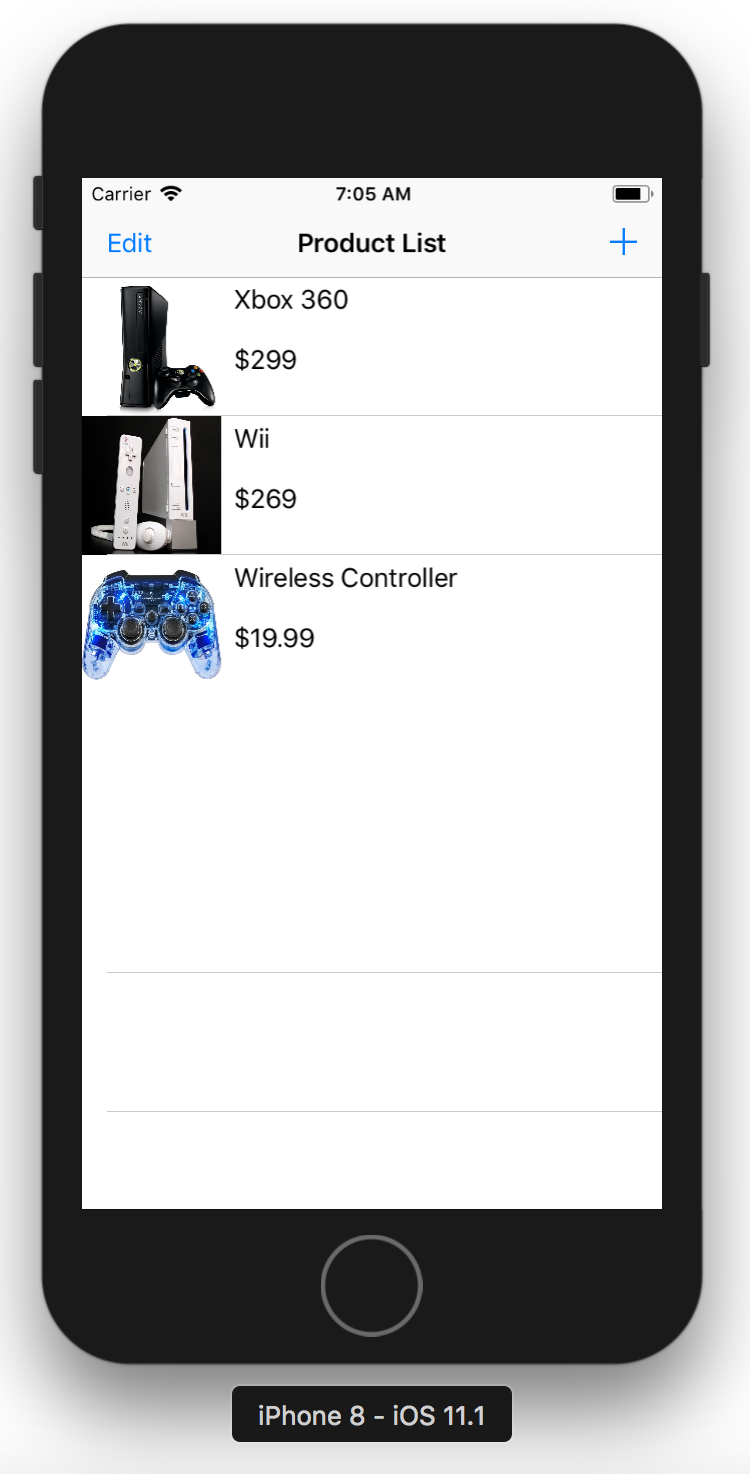
Product list.
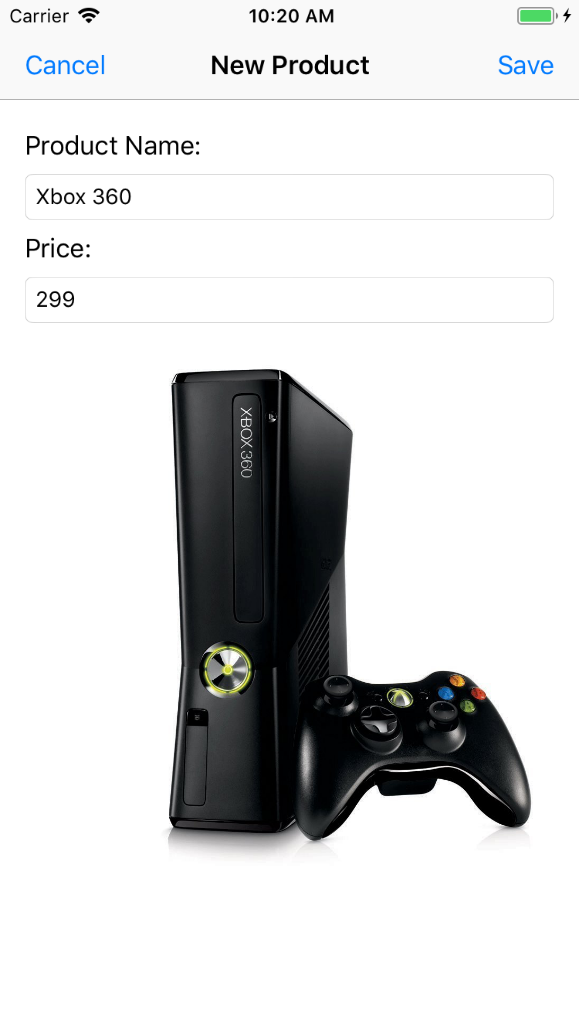
Edit product.
Select photo.
Delete product.
In landscape view.